

Many Trips Around the World is a great scrap quilt, especially if you limit your scraps to a defined color palette. You need lots of scraps, or fat quarters, or pre-cuts. I can't tell you how much because I did not keep track. For the lattice (the raspberry color in my quilt that separates the blocks), you will need 2 yards (more for a bed size quilt); get extra if you want to use this fabric for your binding as well.
Start by cutting your fabric into 2" squares and put it little piles close to your design wall. You can use a tray or a cookie sheet or a clean pizza box to hold your piles (keep each fabric in its own pile).
Note that while I cut my fabric into 2" squares, you can use any size, you just have to be consistent. If you have a lot of jelly roll pieces, charm squares, or you cut your scraps into 2.5" pieces for storage, go ahead and use 2.5" squares. Your blocks will be bigger.
The other thing you need is a design wall. A design bed, or sheet placed on the bed will work as long as you don't need to sleep in the bed at night. This quilt takes some time to put together and it will be frustrating if you have to pack it up each time you stop working on it. A space where you can leave everything will keep you organized and sane.
Start by placing the fabric squares on your design wall. Begin with the single square that forms the middle of each block. I used the same fabric I used in the lattice here but you don't have to. Take four squares of the same print and place them around the center square. Add another round of 8 pieces, then a round of 12 matching pieces, then a final round of 16 matching pieces. Now add your lattice pieces. The lattice pieces will form the outer edges of the adjacent blocks too.
Once one block is formed, you keep adding additonal blocks to the right and left, above and below the initial block. Keep expanding outwards until you have the size you want or have completely covered your design wall, whichever comes first. I made my quilt in four pieces because I could not fit the whole quilt, prior to sewing, on the design wall. Keep in mind that it will shrink in size after sewing.

To keep the block square you use half blocks at the outer edges. I did not put a border on my quilt.

So the big question is, "How do you get from the design wall to manageable blocks you can sew together." When I first contemplated making this quilt, I thought I would sew the squares together in rows across the entire quilt, then sew the rows together. I did not initially see how to do it in blocks. Then I remembered a technique learned many years ago when I was making watercolor quilts. The lightbulb went on and all was clear!
We will construct the quilt in partial blocks of 5 rows by 5 rows, or 25 squares at a time.

And to make it even easier, we'll use fusible, very lightweight interfacing as a foundation for each block. This will make the sewing easy, fast, and accurate.

Pellon makes a product called Quilter's Grid, a very lightweight fusible interfacing printed with a 1" (or 2") grid. I bought my supply at Joann's. Use the size of your quilt before sewing to figure out how much of this you need - it is 40" wide. I used about 3 yards.
If you can't find this product, don't despair. The grid is printed in yellow and I could barely see it. I think it would work equally well if you used the lightest weight fusible you can find and lightly draw a pair of perpendicular lines with a ruler and pencil. Use these lines to line up your squares.
My partial block - five 2" squares by five 2" squares - measures 10" so I cut my pieces of fusible 9.5" square. (I added an extra square to the end of each row to make the overall look more symmetrical and complete. That's why Ihave 41 squares across and down. This means the last block in each row will be 5 by 6 squares, the bottom row of blocks in the quilt will be 6 by 5 squares and the lower right corner block will be 6 by 6. So you will need to cut some pieces of infacing 9.5" by 11.5" and one piece 11.5" by 11.5 ".)
Transfer the block, wrong side of fabric to fusible (sticky) side of foundation, being careful to line up the squares precisely. The top and bottom rows of squares will protrude 1/2" off the fusible, as will the outer left and outer right vertical columns of squares.

Once you have all the squares in the block lined up on the foundation, fuse with iron per the directions that come with the fusible. Be careful to pick up and set the iron down, rather than pushing it around, so you don't move any squares out of place.

The next step is to begin sewing. Fold the block along a seam, finger pressing a crease in place. If you fused the squares down in alignment, the edges will all line up. I did not pin at this stage.
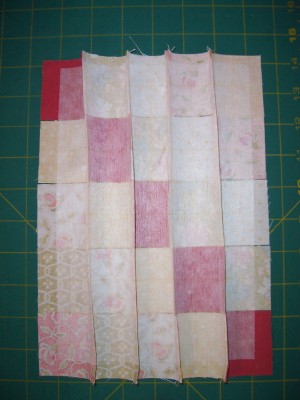
Sew each seam using a quarter inch seam allowance and back stitching 2 or 3 stitches at the beginning and end of each seam. (In the photo below, you can see that the left and right patches extend beyond the edge of the fusible foundation.)

Sew all four vertical seams in the block in this fashion. Your piece will look like this (photo below). Using your rotary cutter and ruler on a cutting mat, cut the finest sliver you can from the crease of each seam. This will cut the seam open so you can press it.
Press the seams open; pressing the seams open reduces the bulk and helps the block lie flat. Then repeat this process for the seams in the other direction. Fold the fabric along the line between two rows of square patches, finger press a crease, and sew. Be sure to keep the seams straight so the patches line up with each other. You can use pins at this stage but I did not need to.

Again, trim the tiniest sliver off each crease and press the seams open. From the right side, your blocks will look like this (photo below). The corners of the individual square patches should match perfectly. If you cut your squares 2", your block will now measure 8" square. It will have shrunk 2" in size because of the seams.

You can see below how the block shrinks in size after sewing.

Once all the blocks are made, you need to sew them together. Sew in rows across the quilt. Match seams and pin. Because you cut the fusible foundation an inch smaller than the block, these seams will not have any fusible attached to them. I continued to press the seams open but at this point of joining the blocks, you can press the seams in alternative directions if you would rather because you don't have the added bulk of the fusible backing.

The photo below shows two blocks that have been joined.

Sew the blocks together in rows then sew the rows together, in the usual fashion. Your quilt top is finished!

I'm thinking of making another Many Trips Around the World quilt in red, white, and blue. How about Minick &Simpson's Indigo Crossing fabric collection?


I love your quilt! Thank you for the tutorial - I will have to try this method.
ReplyDeleteThanks for providing this great tutorial. The directions are very clear & shown in well thought out steps. The way you put each block & divided it into 4 quarters made the assembly quite simple & easy to track.he completed block was very helpful way of breaking down each block into 4 manageable pieces and then sewing the blocks together was a great way to assemble the quilt. You took all the fear & trepidation out of this pattern so even a beginner could successfully complete a complex looking pattern & no setting triangles to deal with in this pattern either.
ReplyDeleteCathy, your quilt is lovely and your instructions are very helpful. I do have one question about the lattice design you created with the raspberry fabric. Were all of the blocks identical, or was the placement of the raspberry fabric varied to achieve the single lattice design? In my failed attempt to achieve the same pattern, my lattice fabric landed in four-square corners as the blocks intersected. Thanks so much for sharing!
ReplyDeleteThis comment has been removed by a blog administrator.
ReplyDeleteI'm really enjoying the design and layout of your blog.
ReplyDeleteIt's a very easy on the eyes which makes it much more enjoyable for
me to come here and visit more often. Did you hire out a developer to create your theme?
Fantastic work!
Appreciate the recommendation. Let me try it out.
ReplyDeleteI'm about to start making this quilt. I have a couple of questions for you. 1) when using the fusible grid, is it necessary to wash fabric prior to cutting? 2)do you notice when using the fusible, if the quilt has a stiffer feeling?
ReplyDeleteHoping you'll have time to answer a couple of questions. When using fusible grid web, does the quilt feel stiffer or it's not much of difference? Please describe. My next question is when using fusible web for a quilt does it require fabric to be prewashed?
ReplyDeleteIt is not necessary to pre-wash the fabric unless you are concerned about color running. I usually don't pre-wash. The quilt initially feels a little bit stiffer because of the fusible web - it is feather weight interfacing with a grid design printed on it - but the stiffness goes away after washing.
DeleteAnother fab quilt, I will save it for another time. Thank you again for the tutorial.
ReplyDeleteLove your quilt! I found this while searching for a pattern call Trip X Two by Charlotte Cottingham ? It was done making 2 blocks with the same colors but light to dark and dark to light contrast. I would love to buy the pattern. But I am going to try it with your method. again, very nice work.
ReplyDelete