Wednesday, February 27, 2013

American Patchwork & Quilting, April 2013

There's a super scrappy version of Many Trips Around the World on the cover of the most recent issue of American Patchwork & Quilting magazine (April 2013).

 
The cover quilt was made by Lissa Alexander using a strip-set technique.  I like the jazzy brightness of her version and the constuction technique looks very easy to follow.  I'm using a different technique for my Many Trips project because I want a more symetrical look for the blocks.  I'm planning to put together a tutorial showing my method.
 
 
I really bought this issue for the project on page 66.  It is called French Braid.  I like the colors, what I call scrappy within a limted color palette.  And these are my colors! 

 
French Braid goes on my very long projects to make in the future list.
 
My posts will be a bit sporadic over the next three weeks or so as I see a very busy time for work and family ahead.


Monday, February 25, 2013

More About Rendezvous

Gosh, thank you all for your kind comments about Rendezvous, my pineapple block quilt.  My last post showing this finish resulted in lots of questions about how I constructed this quilt.  I'll try to answer those here but you may also want to go back and read my post on using the pineapple ruler.

For fabric, I started with a fat quarter bundle (Rouenneries Deux by French General for Moda).  Some of the prints were too large or otherwise unsuitable; I used 30 from the bundle and added more from my stash plus a few new purchases. 

 
My quilt is 68" square (49 blocks, arranged 7 by 7).  For this size, I estimate you need:
  • 18 fat quarters of red
  • 15 fat quarters of lights
  • 9-11 fat quarters of taupe for the blocks that make the outer edges
  • a half yard of red for the center squares
  • 3/4 yard for binding
I say "estimate" because I was not keeping track of fabric usage at the time of construction.  I pulled some fabric from my stash and ordered some online in half yard cuts.  I have about half of each half yard piece left but only small strips from the fat quarters. 
 
You construct the pineapple block in rounds, starting with the center square (similar to making a log cabin block).  The size of the block depends on the width of your strips and how many "rounds" you have.  I cut my strips 1.5 inches wide (1" finished) and my center blocks 2.5 inches square (2" finished).  My blocks are 10" square. 


The distinctive design is formed as you put the blocks together.  The red square is the center of each block while the last pieces are the red triangles in each corner.  (For contruction, the corners are cut as strips than trimmed after sewing.)  I constructed one block as a test, then chain pieced 4 to 6 at a time thereafter. 

 
I got the idea for the taupe border from a photo I saw on Pinterest.  From analyzing the photo, I realized the border was formed by different color placement in the blocks forming the outer edge.  I had the center red blocks on the design wall and pieced the outer blocks two at a time, basically just visualizing where the red needed to go and where to put the taupe strips.  Once you have the first round of color strips on the block, it is easy to follow with the rest of the rounds.


I made 49 blocks and put them together in a square, 7 blocks by 7 blocks.  Just add or subtract blocks for a larger or smaller quilt.  You can make your blocks larger than mine by adding more rounds of strips to each block.  Nicole at Sister's Choice is working on pineapple quilt using 12" blocks, achieved by one additional round of strips.  And you can put the blocks in a rectangular setting if you prefer.

Making the blocks is not difficult but you do have to be careful.  Each time you trim, you get a bias edge and the blocks can become distorted or mis-sized if you pull on the bias edges too much, something that can happen unintentionally when you iron.  (Lift the iron and press, rather than moving it around on the fabric.)

I hope this has been helpful.  I look foward to seeing many more pineapple quilts out in Blogland!

Thursday, February 21, 2013

We Interrupt Our Regularly Scheduled Project To Bring You This Finish!

I got a couple of quilts back from my longarm quilter, Karen Thompson, and the temptation was too great, I had to put aside my current project to bind one of the quilts. So here is my first finish of 2013, Rendezvous.


Yes, it is my pineapple quilt, all quilted and bound.  I chose the name Rendezvous to complement the French General fabrics I used in the quilt.  The fabric used is primarily from the Rouenneries Deux and French General Favorites lines, with some additions from Rural Jardin.  There are a few miscellaneous fabrics from my stash, and the red squares in the center of each block are a script print from the Etchings line by 3 Sisters for Moda. 


Making this quilt involved a couple of "firsts" for me.  It was my first time making the pineapple block (more about that later in this post) and the first time I arranged color in the blocks so the blocks themselves formed the border.  The photos above and below show how I adjusted from red to taupe in the outer rows of blocks to create this border effect.  I like it and will try it again sometime. 


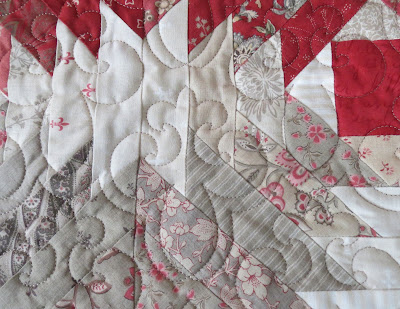
Karen quilted Rendezvous using an all-over (pantograph or edge-to-edge) fleur-de-lis motif.  You can see it in these pictures.  It shows up best in the fourth picture, taken before I trimmed the quilt for binding and you see the motif where it runs off the edge of the quilt onto the surplus batting.


I used fabric from the Rural Jardin line for the backing and a small houndstooth check for the binding. 


Now, about those pineapple blocks.  I made my blocks using a specialty ruler.  I knew about the paper foundation method for this block but wanted to avoid the tedium of tearing the paper off after the blocks are made.  While the ruler worked out OK, if I make this block again, I will give the paper foundation method a try because I think it would be more accurate. 

The pineapple block is very versatile, great for a scrappy two- or three-color quilt like mine but it also lends itself to a totally multicolor version as well.  Give it try!


Monday, February 18, 2013

Trying Out My New Camera

Mr. Main Street gave me a new camera for Christmas.  I decided I better practice with it before our vacation so here are a few shots, even though I've made very little additional progress on Many Trips.

The finished portion of the quilt is on the left.  I folded this part and put it on the design wall so I could continue the partial blocks into the upper right and get the fabrics matched up properly.  The right side of the photo shows what will be upper right part of the quilt, laid out but not sewn yet.  After the little pieces are sewn togethr, it shrinks in size. 

 
It took me a good part of Sunday afternoon just to lay out the blocks shown above.  I have to be careful to match the already sewn adjoining blocks, get a good mix of color across the quilt with not too much of one color clumped up in one area, and work with the fat quarters I chose.  The botton right is going to be even trickier as I am running out of fabric selections but it seems a little late to introduce another print into the mix. 
 
I decided that this will be a throw-size quilt, probably ending up about 65" square.  It will go over the arm of this chair, my reading spot in our living room.  These chairs and the window shades are new; they were selected to coordinate with the existing decor in the room.  I used the cloth on the round table to select all the fabrics in my Many Trips quilt. 


By the way, the chairs and window shades came from Calico Home; I had a great experience with them (the chairs are from their line, their workshop made the shades and reupholstered a pair of chairs) and recommend them if you are redecorating.

The roses in the photo were a gift from some friends to Miss Main Street.  This past week, she was in her school's production of Guys and Dolls, the last musical of her high school career.  It is a year of "lasts" and "firsts" for us!


Wednesday, February 13, 2013

This Basket Must Have Magic Properties

About a year ago, I started the Fig Tree Harvest.  This is what I call my attempt to use all the pretty Fig Tree Quilts fabrics I had been buying but hoarding in my stash rather than using.  Time to put them to use and make a series of pretty quilts.

I took all the Fig Tree out of my stash closet.  I had three fat quarter bundles, a fat eighth bundle, a layer cake, a partial jelly roll, a few miscellaneous fat quarters, some scraps, and several larger pieces I had purchased with borders and backs in mind.  I put the border and backing pieces in a shopping bag and the rest in this basket.

 
The basket is 11" by 15" by 9" high.  It was full with the fat quarters and othe pre-cuts.  Since starting Fig Tree Harvest, I've made two quilts, both on the larger size.

 
Hello Sunshine

 
Summertime
 
I made a third, but it used only a charm pack, so barely counts. I started the Many Trips quilt and pulled 18 fat quarters out of the basket for my next project.  So why is this basket still full?!!!
 
 
Could the fabric be multiplying in there?  Do precuts have babies?  Or is there some sort of loaves and fishes situation going on here, where I will never run out of Fig Tree fabric and will be making these quilts in perpetuity?  Ths shopping bag is still full of borders and backs too.  Looking on the bright side, I have a few more ideas up my sleeve in my head.


Sunday, February 10, 2013

Upper Left

My Many Trips Around the World quilt is about 25% finished.  I finished sewing the upper left quadrant together.


I sewed the top four rows together but left the fifth row unattached.  That way, I could put it back on my design wall and use it to lay out the lower blocks, as a guide to help me get the color placement correct. 


It is still a little tricky because the quilt shrinks so much in size as it is sewn together.  For example, this section was 50" across on the design wall but only 38" across after sewing.  Clearly, the new pieces being added at the bottom don't exactly line up to the guide row but it still helps to have it there.
 
This week, I'll focus on sewing the lower left part of the quilt together, after which I can move to the right side of the quilt.  I've received several queries asking how I go about the constuction of this quilt.  I'm planning a tutorial on it but need to finish the quilt top first before I finalize the tutorial.  It will probably take me another month or so. 


Wednesday, February 6, 2013

McCall's Quilting March/April 2013 - A Review

A few months ago, I bought a polybagged quilting magazine on the newstand and ended up disappointed in the content.   The latest issue is not polybagged and a quick browse indicated promise so I bought the issue.

Not disappointing at all!!!  In fact, lots to love in the March/April issue of McCall's Quilting(Excuse the blurry photos; the real thing is much better.)

 
This design, called Garden Gradation, caught my eye.  Designed by Lisa Bee-Wilson using Kaffe Fassett prints and Kona solids, it is a simple design with loads of impact. 

 
I collected some Kaffe Fassett fat quarters a few years ago, with nothing much in mind except they were different from my usual look and I liked them. I think this might be my project, though in a different colorway.


I also like this design, called Sunset on the Water, by Margaret Okuley. 

 
And there is more.  Another project in the magazine is a way to use and display a button collection.  And one of my favorite designers, Gerri Robinson, has a quilt in the issue as well. 
 
Look for this issue of McCall's Quilting at your local quilt shop or Barnes & Noble. 


Monday, February 4, 2013

Many Trips Progress

I've made some progress on my Many Trips Around the World quilt but I can see where this one will be somewhat slow going.  First, the pieces are 2" squares.  Secondly, it has to be laid out on my design wall before sewing together.  This is what I have so far:

 
upper left quadrant

 
across the top, not at all straight
 
 
I was running out of room on my design wall so decided to sew the upper left quadrant together and then lay out the rest of the design.  


I am sewing the pieces together in blocks of 5 by 5.  I thought of doing 10 by 10, but was afraid of what an unsewing job it would be if a piece got out of place.  5 by 5 is more easily controlled.

Here's a finished block back on the design wall.  There is considerable "shrinkage" after sewing.  What started as a 10" square becomes 8" when sewn (will be 7.5" finished). 


The design wall is a relatively new addition to my sewing space and I can't imagine making this quilt without one!


Friday, February 1, 2013

Many Trips Around the World

First there was the Great Granny Along then Scrappy Trips.  If you read more than a few quilting blogs you can't have missed these online quilt alongs.  I certainly paid attention and was tempted many times to join in - another case of so many quilts, so little time.  In the meantime, I saw another quilt I liked, on the Bemused blog, and just could not get it out of my mind.  Then it came to me!  Here was a project for the Fig Tree Harvest!

Yes, I am making a Many Trips Around the World quilt using my Fig Tree stash.  It has taken some time to plan this out properly, and funny enough, while I was planning it I was also planning our next vacation.  But no,  not a trip around the world!


I had to buy the solid I'm using for the diagonal between blocks (I call this the "trellis"); it is a raspberry color but I don't know what it is exactly because the bolt was not labeled.  I hope I bought enough!  I'd like to make a bed size quilt but will settle for a throw if it all gets to be too much.  There is quite a bit of work involved because the squares are only 2" cut/1.5" finished.  Must get cracking!