Tuesday, September 29, 2020

Great Granny Squared - Finished Quilt


Meet Mabel Mae!


Mabel Mae is my Great Granny Squared quilt, quilted and bound.  The pattern is by Lori Holt of Bee In My Bonnet and is easy enough for a beginner.  I made it from fabric I had on hand (2020 is my year of stash busting), even the backing and binding are from my stash.  

I modified the border design and my quilt is roughly 57" by 70" after quilting.


Mabel Mae was quilted by Karen Thompson using a pantograph design of a leafy vine.  


I used a pale green floral for the binding.  It puts a stop at the edge without announcing it presence so all the focus is on the blocks.


The backing is a floral/ticking stripe combination, likely added to my stash when I was in my shabby chic/cottage design phase.  


I asked for name suggestions when I showed you the finished top and Ellen in Oregon's suggestion of Sweet Granny got me thinking why not name the quilt after one of my great grandmothers.  


Mabel Mae Roberts Briggs Seger was my mother's maternal grandmother.  My mother is the child in the photo below, with her mother, her two grandmothers, and the three great grandmothers that were still alive at the time (this must have been taken in 1936); Mabel is on the far left in the back row.  Mabel was born in 1883 in Wolverine, Michigan, a logging town in the northern part of the lower peninsula.  She married Joseph Briggs in 1903 and had three daughters; the eldest, Ruth, was my grandmother.  They moved to Lansing around 1914 and opened a dry goods store.  After Joseph died, Mabel continued to run the store and later, was married again, to Art Seger.  Mabel died in 1958.


Mabel was a quilter and her quilts were well-used so few have survived to today, but my mother does have a few.  My grandmother sewed as well but once the Depression and World War II were over, and consumer goods were back in stores, they did not do much sewing as they associated it with having to "make do" and felt they did not need to do that any longer.  My mother is a great cook but never liked the sewing part of home economics; when I see her, she often has something for me to fix or a pair of pants to hem shorter.  When I was in junior high, all the girls had to take home ec (the boys had workshop) and I enjoyed the sewing part.  In the lead up to the bicentennial in 1976, there was a refocus on traditional Americana, including quilting, and that's when I became interested, though I did not get totally immersed until about 1992, and obsessed shortly thereafter.  

An aside about the family photo above.  When I worked in the skincare industry, I used the picture to illustrate how expectations of aging have changed.  The three great grandmothers in the middle of the back row were in their early and mid 70's at the time the photo was taken.  The two grandmothers were 53 and 55.  All I can say is thank goodness I have tretinoin, sunscreen, and advanced moisturizers!


photo signature_zps7mcw44cc.png

Wednesday, September 23, 2020

Sewing Bags and Bins - Part 3 - Lola Pouch by Sotak Patterns


I follow a number of quilting blogs and several bloggers have posted zipper bags they made and mentioned how addictive making them can be...now I understand!


A zipper bag seemed like a natural companion for my Sierra Bin but there are so many patterns out there.  After much review online, I chose the Lola Pouch by Sotak Patterns, and purchased the pattern as a download from the Etsy shop.   I was drawn to this pattern because it seemed fairly simple but with no exposed seams inside or need for a serger (I don't have a serger) and that I could use two fabrics to coordinate with my bin.  

The instructions were very easy to follow, with explanations and "pro tips" that helped the construction process go smoothly.  Even the zipper installation was easy.  I used my machine's zipper foot for the zipper and the binding (the binding encloses the zipper tape and the top raw edge of the bag), though the instructions don't call for it so if you don't have one, you will probably be okay.  The small bag went together quickly so I decided to make the large bag too.  These bags are lined and I learned a "pro tip" that helps the lining fit smoothly; I'll be applying that tip to all future bags (it involves making the seams of the lining 1/8" deeper than the outer seams, so the lining is that tiny bit smaller than the outer bag - it worked perfectly).


The small bag holds spools of thread I purchased to match the fabric I'm using in my Flowers for Emma hexagon flowers.  The zip bag can go right inside my Sierra Bin.  The "handmade" zipper pulls are from Fat Quarter Shop; only $2 apiece!  I used light weight interfacing in the zip bags; the pattern doesn't call for batting but you could add it if you want the padding.  

Now I understand about the zipper bag addiction and will no doubt be making more.

This is the end of my sewing bags and bins series.  I'm well supplied and organized, and will be back next week with a finished quilt.


photo signature_zps7mcw44cc.png

Tuesday, September 22, 2020

Sewing Bags and Bins - Part 2 - Sierra Bin by Indigobird


I'd been looking for something that would easily hold my English paper piecing project and tools and could be transported around the house.  I'd been using a small tin to hold the tools but it is not large enough to hold the project in process as well.  Then a few months ago, I happened across the website for Indigobird patterns, found the Sierra Bin pattern, and thought it looked like the perfect solution.

I bought the pattern from the Indigobird website as a pdf download.  BTW, I've bought pdf download patterns a number of times, from Etsy and from independent designer sites, and never had a problem...just in case you've been wondering about it.


I had a piece of chambray fabric in my stash that I thought would be perfect for this bag.  It's a lightweight upholstery fabric remnant I bought years ago, it's been sitting around waiting for a project to come along!  It looks quilted but it is actually some kind of bonding that gives the quilted effect.  I needed some contrast trim and lining fabric, and again, ransacked my stash.  


The measuring twill tape is backed by a small piece of Liberty cotton, purchased from Spotweldon on Etsy.  I used a whimsical Union Jack heart print for the lining.


The lining is created with a series of pockets round the inner walls of the bin.  They are perfectly sized to hold small items like little scissors, a needlebook, small tin of Wonder Clips, etc.  


Here's the bin filled with my current EPP project, hexagon flowers for a Flowers for Emma quilt.  Tools are in the pockets around the edge.  The center holds my Super Bobs donut of thread, Clover needle threader, small pin cushion, and plastic bags of cut fabric, papers, and fabric covered papers ready to be sewn.  The finished flowers can go in the bin's outer pockets, one on each side.  And there's room to toss a small zipper bag in on top (and I just happened to make one of those, more about it tomorrow).

The design and pattern for the Sierra Tote +  Bin is extremely well thought out and the instructions are very detailed, with lots of photos so each step is well illustrated (the pattern printed out is 24 pages).  I had no problems following the instructions and all the pieces fit together perfectly.  I've made a few bags over the years and usually struggle to get the lining to fit smoothly but did not have any problems with this one.  Because I used heavier fabric for the outer bin, it is sturdy and the sides don't cave in or sag so I think this pattern is perfect for light or medium weight upholstery fabric or canvas.  If you use quilting cotton, you will need heavier interfacing to provide more body.  I'm very happy with my bag; I'll make another one as soon as I figure out what to use it for.

Come back tomorrow for an account of my experience making the Lola Pouch.


photo signature_zps7mcw44cc.png

Monday, September 21, 2020

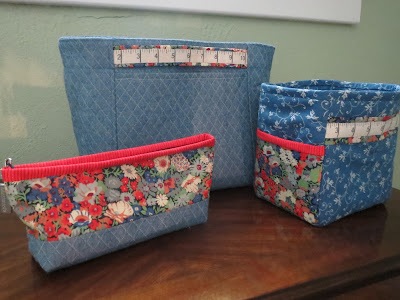
Sewing Bins and Bags - Part 1 - Little Snippets Thread Catcher From The Bonnie & Camille Quilt Bee


This past week, instead of making quilts, I've been making bags and bins to hold my quilt stuff.


First up is the Little Snippets Thread Catcher from the Bonnie & Camille Quilt Bee book.  The book was the subject of my last post and is a worthwhile addition to your quilting book library.  I was really taken with the thread catcher when I read the book and wanted it to be my first project.  

I had plans to make some other sewing bins and bags, mainly to hold my English paper piecing suppies and projects, and wanted to make the thread catcher in the same coordinating set of fabrics from my stash.  I started by making the star block shown in the original but goofed up because the fabrics I used did not have enough contrast for the star to be visible.  But while I was looking for a lighter fabric to add to my set to remake the stars, I thought of simplifying while using the measuring twill tape in a different way. 


So instead of the pieced blocks, I have the measuring twill tape on two sides and the pockets on the other two sides.  I deviated from the directions in one other respect; besides using batting, I used a medium weight interfacing to make the sides stiffer to keep them upright and prevent sagging.  I think it was a good idea, though closely spaced quilting could have the same effect.

The directions are easy to follow, I just had one problem and that was my fault.  I reviewed all the instructions thoroughly before cutting and was certain there was a misprint or mistake because the cutting measurements did not make sense to me.  Then I realized, I was thinking of the thread catcher as a cube, with a square as the base, but the base is a rectangle and the sides with the star blocks are wider than the ends with the pockets.  Once I understood that, all went well.   I did use a walking foot on my machine and wonder clips instead of pins to hold pieces together prior to sewing.  The most difficult part was attaching the binding to the top because it is a small opening and took some maneuvering to guide it under the sewing machine needle.  

I'll be back tomorrow with more about the other items shown in the top photo, the Sierra Bin and the Lola Pouch.


photo signature_zps7mcw44cc.png

Wednesday, September 9, 2020

The Bonnie & Camille Quilt Bee Book

Wow, am I ever enjoying this book!  


The Bonnie & Camille Quilt Bee, by Bonnie Olaveson and Camille Roskelley, published by Fat Quarter Shop, is something special.  Like most quilt books, it has projects to make but interspersed with the project directions are anecdotes about the joy quilting has brought to the lives of both authors (who happen to be mother and daughter) and the connections they've made with other quilters.  It is really heart warming, especially in this time of Covid-19 when we can be starved for human connection, and I spent a very enjoyable afternoon browsing through the book.  

I have my eye on a few key projects. First is this thread catcher.  


It will be adorable on my sewing table and also handy to take to my crafting afternoons (once this Covid thing is behind us).  And of course, there are quilts.  Besides the cover sampler quilt, I especially like the red and white Starburst Quilt...


... and Bonnie's Beehive Quilt.


Bonnie and Camille each made a quilt from the over 1,000 Beehive blocks they received from around the country and world after Camille asked Instagram followers to help with a project by making this small block and sending it to her.  They were overwhelmed with the response, which says something about the quilting community's desire to help and the esteem they have for Bonnie and Camille.  

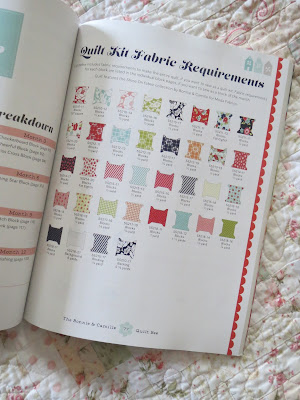
I was also struck by the high quality of the art direction in this book.  It has all been thought out so well.  For example, the general directions for the cover sampler quilt give fabric requirements for those who want to make the quilt exactly like the sample.  Instead of just listing the order number for each fabric, there are these darling images of each print in the shape of a spool of thread.


The book includes directions for all of the blocks in the sampler quilt as well as how to assemble it, directions for the Beehive block and the two quilts and a pillow, several other quilts and the thread catcher.  Plus a bonus cross stitch version of the sampler quilt.  I consider it an excellent addition to my quilt book library and think you will enjoy it too.


photo signature_zps7mcw44cc.png

Tuesday, September 1, 2020

Trip Around The World Quilt - Finished Top

An upside of this year's pandemic is that I've been a prolific quilter.  I have another finished top, a design called Trip Around the World.  


Trip Around the World has long been on my quilting bucket list but I wasn't sure how to machine piece it.  Years ago, I saw directions for hand piecing this quilt, one round at a time, but figured that would be too time consuming for me to handle.  

Then I happened upon the summer issue of American Patchwork & Quilting and there it was.


APQ has been running a regular feature with directions for reconstructing a vintage quilt from the collection of the editor, Jody Sanders.  Their instructions show how to piece this quilt on the diagonal (duh!) and they give fabric requirements.  

I wanted this quilt for our family room and drew fabrics from my stash, inspired by the upholstery fabric in this throw pillow.   Our family room is the sun room, with windows on three sides and the remaining walls painted a dark, teal green.  We have one teal green arm chair, a beige tweed couch, and beige tweed carpeting.  This upholstery fabric is in the pillows and the window treatments.  


I wanted a smaller quilt than the quilt in the magazine, so I subtracted one square from the middle column and added fewer rounds.  Here's the start on my design bed.  While you could theoretically strip piece this entire quilt, my strips tend to start bowing or going wonky in some way when I join more than five together so I limited myself to three or four at a time.  


I pulled the fabric from my stash, then planned three or four rounds as I went along.  I knew I wanted to end with green but none of the other rounds were definite in my mind, I just kept trying things.  I bought this green tone on tone fabric in a quilt shop some years ago, sure it was a good match for our walls and while I used it in another quilt, I still had several yards left.  

You don't need much fabric for the early rounds.  The center can be made from scraps and early rounds can use a left over jelly roll strip or fat quarter.  But as I worked my way outwards, the fabric requirements grew, with intermediate rounds using about a half yard, and the outer most rounds a yard of fabric.  

Most of the fabric came from my stash, but I did purchase three pieces to round out the selection.  


The finished top is 64" by 72" and is already with my longarm quilter.  


photo signature_zps7mcw44cc.png