Showing posts with label WIP. Show all posts

Tuesday, September 6, 2022

Moda Blockheads 4/Little Blocks 4.5


I have 17 4.5" blocks (finished size) made and I am putting this project aside for now.


I've been making the blocks out of Christmas-y fabrics, bits and pieces from my stash.  I like the blocks but don't know what I am going to do with them and have kind of lost the love for this project.  Mostly, I've realized that I really don't enjoy the process of foundation paper piecing.  When I made Rainbow Connection, I was excited enough about my vision for the finished quilt that I could tolerate the process.  Not so much now that I don't have an endpoint in mind.  I much prefer the process of making the regular pieced blocks from the Moda project, and I plan to go back to it as soon as I have a plan for the blocks.  I may even add more from the Little Blocks project.  

But until then, I need a project I can love, and I have something in mind.  But first, I'm going to make some items of a "practical" nature.  Look for an update soon. 


photo signature_zps7mcw44cc.png 

Thursday, July 14, 2022

Pirouette, A Finished Flimsy


And the top is finished!  It is not quilted yet but I put it on my bed to see how it looks (also to be sure it is big enough).  I enlarged Pirouette, from the book A Scrapbook of Quilts, from 16 blocks to 25 blocks so it would fit a queen size bed.  And I made the outer border 4" wide to add a bit more.  I think it will be about 93" square after quilting.


The color in this close-up photo is closer to "real life" than the photo above.  The 30's reproduction prints are bright and cheerful.  


I had to buy some fabric for the back as I did not have anything big enough in my stash so I went for a wideback fabric (108 inches wide) because my least favorite part of quilt making is piecing the back.  I am going to take this to a longarmer to quilt and am contemplating designs while I wait for the back to arrive.  I want a design that will make the seams in the white areas less apparent.  I do have some fabric for the binding.  It is a blue print, the same blue as the solid I used for the tiny cornerstones in the center of each block.  

This quilt was a good stash buster though I still have enough 30's reproduction prints to make another quilt.  I'm thinking maybe a log cabin.  But that won't be my next project as I have a few things in the pipeline to get to first. 


photo signature_zps7mcw44cc.png


Monday, July 11, 2022

Pirouette Update


It's been a while!  I took a bit of a sewing hiatus; I was just not in the mood.  Then suddenly, and fortunately, my mojo returned and I got back into my sewing room.  I have all the blocks finished for Pirouette.  


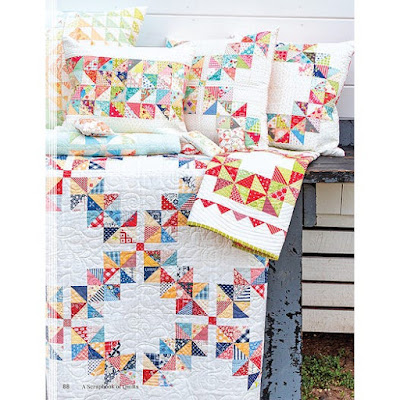
Pirouette is in A Scrapbook of Quilts by Joanna Figueroa and Carrie Nelson.  It is a great quilt book, well worth having in your library.  The directions call for 16 blocks, set 4 by 4, but I am enlarging the quilt to fit a queen size bed so need 25 blocks.  

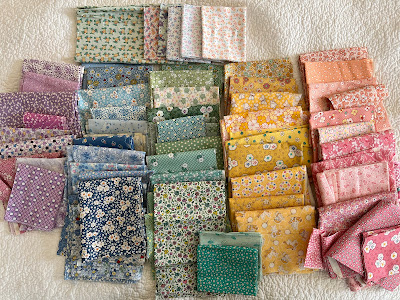
I wanted a retro look so I am making this quilt using 30's reproduction fabrics from my stash.  I've had this fabric a long time and it feels good to be finally using it.


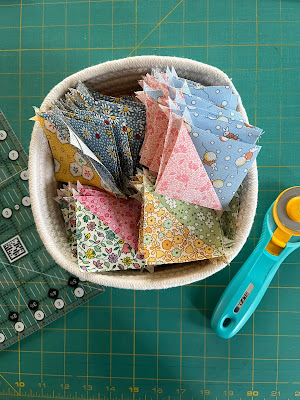
The first step is to make a zillion "building blocks" out of triangles.  I used Triangles On A Roll to make mine.


Next step is to sew the blocks together into the quilt top.  More soon.


photo signature_zps7mcw44cc.png

Thursday, March 24, 2022

Progress On My Weekday Quilt Project


I'm working on two quilt projects simultaneously.  It isn't my favorite way to work on quilts but one project is a block of the week, with new blocks dropping on Fridays so I work on them on the weekends usually.  I fill in during the week with the other project, Pirouette, from A Scrapbook of Quilts, by Joanna Figueroa and Carrie Nelson.

In the past month, I've gone from the fabric pull...


...to lots of HSTs...


...to the basic blocks.


I have about fifty of these blocks made; I need 100.  I'm enlarging the quilt from the original design with extra blocks so it will fit a queen size bed.  It was pretty slow going at first because I am a fabric placement obsessive.  Each block uses 10 smaller blocks (the HSTs) and I would hem and haw over which to place where, what colors and prints look best next to each other, and so on.  I finally landed on a system.  Because I used fat quarters and triangles on a roll, I have 28 HSTs in the same print combinations.  I put them in separate piles on my table, lined up in rows so the colors were fairly dispersed.  Then I made a block using HSTs 1 through 10, the next block used HSTs 2 through 11, and the next used HSTs 3 through 12, and so on.  I adjust only to avoid having two triangles of the same color next to each other, but it rarely happens.  It is working well and I spend less time obsessing, more time sewing.

I made this project bag a few years ago; I have a few.  They are handy for keeping all the items for a project together - the pattern, fabric, precuts, etc. - until I get to the project.  This one is holding the finished blocks.  


I'll be back soon with an update on the weekend project.

photo signature_zps7mcw44cc.png


Wednesday, February 16, 2022

Starting To Pirouette


I'm working on my Little Blocks 4.5 sampler; with three blocks released every Friday, it makes a great weekend project.  Deciding I need a concurrent project for weekdays, I started Pirouette.  


Pirouette is one of the excellent designs in A Scrapbook of Quilts, by Joanna Figueroa and Carrie Nelson.  When I got the book last year, I knew immediately that I wanted to make this one, it was just a matter of identifying the best fabric to use.  


It occurred to me that I had a lot of 30's reproduction prints stored in a bin and they could work nicely in this design.  Moreover, I have a gift recipient in mind (but better not mention it here).  The fabric is left from making two quilts for Miss Main Street's "big bed" when she moved from the crib.  Miss Main Street is 26 so this fabric practically qualifies as vintage.  It was all in good shape though, especially after a good starch 'n press.


The first step is to make eleventy gazillion HSTs.  I'm using Triangles on a Roll paper, which helps with both accuracy and speed as most of the fabric is partial fat quarters and fat eighths.  When I get down to smaller pieces, I'll use the traditional method.  


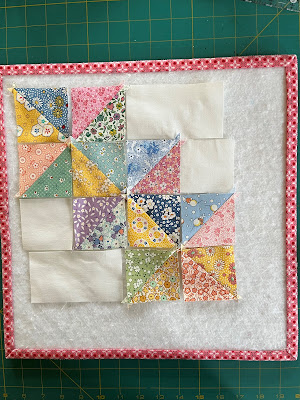
I've made a good start.  Tearing off  the backing paper is the most boring task, made better by doing it while watching a Winter Olympics broadcast.  Here is a block laid out on one of my design boards, not yet sewn together.  


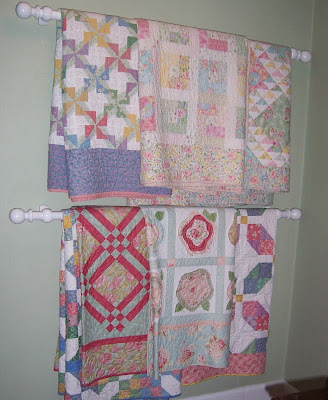
Here's a glimpse of some quilts I made long ago using 30's repros.  The windmill block quilt on the upper left was one of the first bed size quilts I ever made; I probably made it in 1998.  It alternated on Miss Main Street's bed along with the one next to it.  The two underneath quilts on the lower rod are also in 30's repros.  


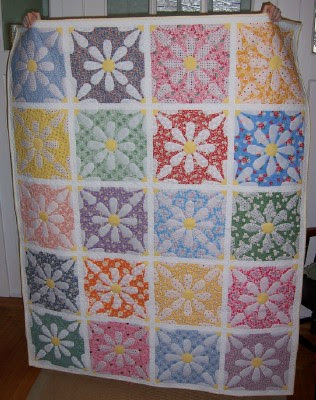
And for this one, Shasta Daisy, I used 30's repros for the foundation of each block.  


I'm enjoying working with these fabrics again.  There is something cheerful about them, and
cheerful is what I need now. 


photo signature_zps7mcw44cc.png

Tuesday, June 22, 2021

Little Blocks 365 Wall Hanging


I have a finished flimsy.  It's the wall hanging I've been making from the Little Blocks 365 sew along.  In this sew along, the organizer releases seven blocks each week; keep up and you will have 365 blocks at the end of the year.  But as my chosen setting requires only 56 blocks, I've been selectively sewing from the blocks released so far and have enough for my finish.  

I started with a charm pack of solid colors from Michael Miller, quickly saw it would not be enough fabric, and added a fat quarter bundle.  


A few weeks ago, I was here:


And now I have this finished top.  


It was hard to get a good picture as no one was available to hold it up so it is stuck to my design boards but they are not quite big enough for this 42 inch square top.  (Ignore those gray-ish smudges, it is just water from when I steam pressed the top right before taking the photos and they've since disappeared.)

The block layout is from Zen Chic; you can see her original quilt here.  Brigitte Heitland of Zen Chic participated in the Moda Blockheads 3 sew along and this is the setting she used for her finished blocks.  However, her blocks were 6 inches and made a quilt 81 inches square.  My blocks are 3 inches and the top is 42 inches square.  

I'm very happy with my top, I just need to get it quilted.  Given that the sew along has more than six months to go, with more than 180 blocks yet to be released, I am thinking of making more for a second wall hanging.  I just need another creative setting suitable for these eclectic blocks.  I am thinking of using this selection of solid color fabrics that Kona put together in a color combination they call "Dublin."


But I need a rectangular setting that will work in my kitchen space, ideal for quilts that are 35-40 inches wide and 50-60 inches long.  Any suggestions?

I think these tiny 3 inch blocks are perfect for solids and blenders because you don't lose any of the fabric design when you cut them into tiny pieces (many of the pieces in these blocks are smaller than my finger nails).  I found another fat quarter set in my stash, this collection is called "Speckled."


If you are interested in doing something similar, the Fat Quarter Shop has a broad selection of fat quarter bundles of solids.  They have bundles that match the colors in fabric lines by various designers, like this "Me & My Sister" bundle, as well as other themes like "pinks" and "birds of paradise" (I particularly like this one).  In case you are interested, I used 11 fat quarters in my top (though did not completely use up any of them), as well as a few pieces from the charm pack for contrast.  And the blocks that include white use Kona white (which I also used for the border) and some scraps of a small text print.

There is not enough time to take advantage of the all great fabric available now!

photo signature_zps7mcw44cc.png


Tuesday, May 25, 2021

Little Blocks 365 Update

I've been working on my blocks from the Little Blocks 365 quilt along.  These are 3 inch blocks constructed using the foundation paper piecing method.  The organizer, Sentimental Stitches,  releases seven new blocks every Friday and after a year, you will have 365 blocks.  I'm enjoying this project, though foundation paper piecing is not my favorite method so I have pieced some the simpler blocks using traditional piecing.  

This is where I was at my last update:


This is where I am today:


Sorry for that glare; the sun was shining in the window behind my "design boards."  To keep organized, I'm working on my blocks in rainbow color order, currently tackling yellow and green.  I only need 56 blocks for my setting so I don't make every block released, just those that especially appeal to me.  And I've subbed in a few favorite blocks from other sources, like the heart.  

I need seven more blocks to complete my planned setting, though I will probably make more so I can be picky and just include the best ones in the final quilt.  I'm getting a lot of enjoyment out of this quilt along and may join another next year.  


photo signature_zps7mcw44cc.png


Tuesday, May 4, 2021

APQ Quilt Along Update


I have all 30 blocks for Square Dance, this year's American Patchwork & Quilting quilt along Project, finished and sewn together with the sashing, posts, and inner border.


I tried several different arrangements for the blocks and liked this rainbow-ish layout best.  But it did cause me to rethink my choice of border fabric.  I made the blocks from 30 pieces taken from the bundle of fat eighth cuts shown on the right in the photo below (all from assorted Laundry Basket Quilts lines for Andover Fabrics).  The large floral print on the left was supposed to be the border.


I love that print but I don't love it with the assortment of blocks; the blocks need a border fabric that is less busy, that will provide a frame but not overpower the blocks, while the border fabric would be ideal with a simpler assortment of blocks that will not fight for attention with the big floral print.  So... on to Plan B.  I ordered a simple tone-on-tone print in dark navy for the border to audition with the blocks.  While I wait for it to arrive, I will work on some other things.  I have several quilts to bind, plus my handwork "portable" projects.


photo signature_zps7mcw44cc.png


Thursday, February 11, 2021

Modern Handcraft Snowflake Quilt - Snow Day


We've had an unusual amount of snow in NJ over the past two weeks, keeping me indoors and working on this snowflake quilt.  


It is from a pattern by Modern Handcraft; she recently held a sew along but I wasn't ready at that time.  It is a very well written pattern with lots of illustrations and a few photographs, in an 18-page booklet.  Very thorough and easy to follow, I 10/10 recommend!

For the background, I used various blue fabrics leftover from the quilts I made in blue and gold when my daughter was in high school.  I wanted a wall hanging that would fit in my kitchen so I reduced the size of the quilt from 60" by 72" to 40" by 48" by reducing the size of squares of fabric that make up each block.


The first step is to cut out the fabric then make the HST's that give the snowflake image it's shape.


Instead of using solid white fabric for the snowflake, I used Michael Miller Fairy Frost in the snow white color.  It is hard to see but it is printed with a little bit of gold that gives the fabric a pearly shine.  


The top went together fast and I'm happy with the way it came out.  I think it will look even better after it is quilted.  


Funny story:  I asked Mr. Main Street to help me by holding the quilt while I took photos.  After we were done, he asked me, "What is this design supposed to be?  A Viking rune?"  In his defense, he likes designs that are centered and have symmetry but it is a good thing I have you blog readers for positive feedback!

photo signature_zps7mcw44cc.png


Wednesday, January 20, 2021

Like Sunshine On A Cloudy Day - A Finished Quilt


I have a quilt finish to share; I'm calling this one Like Sunshine On A Cloudy Day.


This quilt was inspired by a string quilt I made several years ago.  It is my most used quilt and I thought something similar to use in rotation could be a good idea.  Inspiration also came from my stash, as it holds a lot of floral prints in light colors, mainly from the 3 Sisters collections for Moda.  I was really wanting to make a quilt from my stash, something I would really like and not just for the sake of using the stash (I put too much time into my quilts to spend it making something I'm not enthusiastic about).


I sent the top and backing to Karen Thompson, my longtime quilt collaborator.  Karen used an edge-to-edge design that is similar to Baptist fan, a quilting pattern I'd wanted to use for a long time.  


I bound the quilt with a darker pink tone-on-tone print.  It makes a nice finish and complements the darker pinks in some of the floral prints. The blocks are just 6" square and each strip of fabric in the block finishes at 1" wide so this is a good block for those leftover bits and pieces of fabric we all have.


I even used fabric from my stash for the back.  This is big quilt, 96" square for a queen size bed, and I didn't have enough of any one print but I had two coordinating prints.  I must have bought these with some use in mind but I can't remember what.


I'm happy with the way this quilt turned out and have it on my bed now.  It's like a ray of sunshine on these dreary January days.


photo signature_zps7mcw44cc.png


Tuesday, July 7, 2020

Like Sunshine on a Cloudy Day - A Finished Flimsy


The top is finished!


All 256 blocks are now assembled into the quilt top.  And it's a big one, 96 inches square, ample for a queen size bed.  


I love the blend of colors.  I made this quilt entirely from stash, including the back.  The binding will probably come from my stash too, though I haven't decided what to use yet.


Making this quilt emptied one plastic bin; of course, it will get refilled soon enough.  I store larger pieces of fabric (1/2 yard and longer) by wrapping them around cardboard into mini bolts; they go on shelves in the closet in my sewing room.  I store unopened precuts on the shelves too, along with fabric "pulls" for specific projects.  All my smaller pieces of fabric are in plastic bins.  I have four large bins (the size sold for under-bed storage) upstairs in our 3rd floor attic storage and seven (now six) smaller bins stacked in the closet.  They are organized by color.  I also have the Fig Tree Harvest basket, the one that never seems empty, no matter how many quilts I make.  And a 3-drawer rolling cart holding a combination of precuts and large cuts of fabric I bought to use as backing.

Well, time to get this one off to my quilter, then to work on the next project!


photo signature_zps7mcw44cc.png