Monday, December 30, 2013

Last Finish of the Year!

I squeezed in one last fnish this year.  It is my blue and gold version of Denyse Schmidt's Point Me pattern. 

 
I pieced this quilt in the late winer/early spring, when I made two blue-and-gold quilts in rapid succession.  For this quilt, I used a dark navy solid fabric with yellow and gold fabric triangles, and used a lighter navy solid in the other quilt.  I like to make a quilt in the school colors for the Parents' Association fundraiser auction at my daughter's school each year.  I donated Falcons In Flight to the auction in 2013, reserving the Point Me flimsy for 2014. 


Even though Miss Main Street has graduated and moved on to college, I still like to help out.  I've got to quilt and we certainly have more than we need so why not make one for this cause that means a lot to me.

 
This is a close-up of the quilting on Point Me.  It gives the large open spaces a nice texture.  I bound the quilt over the Christmas holiday.  All I need now is the label, but before I can make the label, I need a name for the quilt.  I'm thinking of Point Me in the Right Direction.


Thursday, December 26, 2013

Color Essentials by Amanda Murphy

I hope you had a wonderful Christmas.  We had a good day here, with good company and lots of wonderful food.  I received several quilting books as gifts so I plan to provide some reviews in between project progress updates.

First up is Color Essentials by Amanda Murphy, published by Stash Books.   

 
I thought this book would go in-depth about color theory and how to apply it to making quilts.  While there is some brief coverage on color theory, it is really about using solid color fabric for quilt making, specifically using the Kona Cotton precuts put out by Robert Kaufman.  Some of the color combinations are really spectacular (I must buy the Kona Sunset palette!) and I really liked the section on achieving transparent effects with different colors (transparency placemats project). 


Most of the projects are very fresh and modern looking, and they don't all require white background fabric.  Most of the projects are pieced but some combine piecing with machine applique.  Another thing I really like is that for each project, there is an additional page depicting alternative color combinations.  The original project is sewn and quilted; the color possibilites are computer generated drawings. 


I may not make any of the projects in the book but I have benefitted from the color inspiration found in its pages.  


That's the Kona Sunset palette above.  See what I mean!

Monday, December 23, 2013

Working on Trellis Crossroads

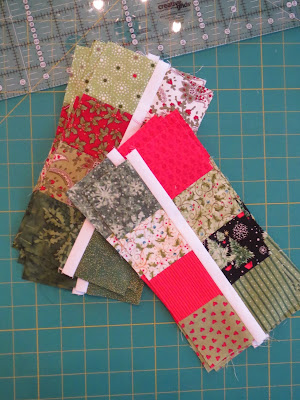
I don't have a lot of time for sewing during the holiday season but I got started on my Christmas-y version of Trellis Crossroads anyway.  To start, I need 120 sets like this and have most of them finished.


Much as I like the design, I am not impressed with the pattern directions.  My first complaint is the absence of any little tips regarding techniques for making the block.  For example, the step where you join the two rows of squares to each side of the narrow white strip calls out for a tip on how to keep your seams lined up on either side of the white strip.  This is especially crucial because the white strip is cut overlong and trimmed after the block is together, so it is very easy for the seams to become mis-aligned.  But there is nothing about it.  And there aren't any pressing instructions!  How can you have a quilt pattern without pressing instructions!  Pressing in the correct direction will make joing the blocks so much easier. 


I read ahead in the directions to try and figure out the best way to press.  I ended up pressing the seams in the pieced strips open and pressing the long seams towards the white strip.   The finished width of this strip is only half an inch so the seam allowances meet in the middle.  So far, so good; my seams are lining up on either side of the white strip and the block is good and flat.  So the absence of these instructions are not a deal-breaker but could make it difficult for a novice quilter.


If you like what you see and want to know more, the pattern for Trellis Croasroads is from the book Modern Bee by Lindsay Conner.
 
I have to put  this project away for a few days, clean up the sewing room and transform it into it's alter ego, the guest room.  My mother is arriving later today for a 5-day stay with us.


Wednesday, December 18, 2013

Only 372 Sewing Days Until Christmas!

Call me Crazy, I'm starting another Christmas quilt!  I've got plenty of time to get in done for Christmas 2014.


Remember when I showed you this book, Modern Bee, that I found at my local library?  Well, one of the designs kept calling to me.  I could see it in my mind, made from Christmas fabrics from my stash.  Fabric from my stash plus pattern from the library, that's practically a free quilt!


It's this design, called Trellis Crossroads. Only my version might be called Christmas Crossroads.


The only snag is that I have a limited amount of time to keep the book. So I have to get cracking!


Monday, December 16, 2013

Wintergreen

Thank you all so much for suggesting names for my latest quilt.  The design comes from Kim Diehl's book Simple Comforts, where it is called Twilight Hopscotch.  But at the suggestion of Nicole, I'm going with Wintergreen

 
I love anything mint flavored and Wintergreen fits the colors in the quilt so well too.  Here's a close-up of a block, where you can see that it uses two different green fabrics, a snowflake batik (from Tonga) and a metallic gold speckled green.  The background is Kona White. 


This quilt was quick and easy, especially after I got the tiny four-patch units finished.  If you are interested but don't want the entire Simple Comforts book, the publisher (Martingale) sells an epattern for the quilt for only $4.99. 
 
 
I won't really be able to enjoy this quilt this Christmas but that's ok, I feel good knowing it will be quilted and bound in plenty of time for next year's Christmas decorating.  And it was enjoyable to make something seasonal during the season!


Wednesday, December 11, 2013

Sashed

I pieced the sashing on Monday evening then last night I began sewing the whole quilt together.  More to do but you can now see how the design comes together once you add the pieced sashing to the blocks. 


Kim Diehl, the designer of this quilt, called her version Twilight Hopscotch but I need a new name.  At the moment, I am partial to All Is Calm, though this does not need to be a Christmas quilt exclusively so maybe something else would be better.  What I mean is, do you have a suggestion?

Monday, December 9, 2013

Twilight Hopscotch Progress

It's been slow going for me with this project but at last, all 16 blocks for Twilight Hopscotch are finished and on the design wall.


The rest of the design will be formed by the pieced sashing, which is a project for the upcoming week.  I want to get the top finished before I have to clear up the sewing and transform the quilting room into the guest room, in time for my mother's Christmas visit.

The quilt is really easy to make, and fast once you get the little four-patch sub-blocks made.  It is just that I've had other things demanding my time lately. We are having new hardwood floors installed on the first floor of our house in early January, a project that has taken some careful planning as we need to move all of the furniture and rugs out of the rooms and fully vacate the house for about 12 hours each day while the finish dries.  It has taken some planning to figure who and what is going where and when.   Then we'll have to move it all back in again and put everything away.  Where's Carson the butler when you need him?

Friday, December 6, 2013

Christmas Quilts Past, Part 3

My first quilt was a log cabin, made in a class based on Eleanor Burns' Quilt in a Day book.  While I was working on that quilt, my sister told me she was pregnant so it became a baby quilt for Nicholas , who is about to celebrate his 21st birthday (yikes!).

This is my second log cabin quilt, made using fabric left over from the three scrappy star quilts in Monday's post. 

 
By the time I made this quilt, I knew about longarm quilting so I "outsourced" the quilting for this one.  I has an all-over design of holly leaves using a varigated red and green thread that shows up very nicely in the light portions of the quilt. 

 
I've been thinking about making another log cabin quilt; that may go on my "list" for 2014.   But something for my short-term list are embellished kitchen towels.  I made these a couple of years ago, super easy, and they make a good hostess gift, teacher gift, or gift exchange-type present. 

 
I bought the base towels at Target; you can get similar at Walmart, Home Goods, or Bed Bath & Beyond.  I sewed strips of fabric together, then sewed the ric rac at the top and bottom edges, turned it under and top-stitched to the towel, turning in a quarter inch at each side.  I added prairie points to the towel in the middle; not difficult but it does take more time. 
 
I'm looking forward to a crafty and quilty weekend; I hope you have some fun planned too!


Wednesday, December 4, 2013

Christmas Quilts Past, Part 2

This is our Christmas tree skirt, another early quilt project.  We moved into this house in 1997 and I think I made it that year or the next.  I used a pattern but can't locate it now.  I know I enlarged it from the original, I think by making 8 hearts instead of 6 and placing them on the perimeter of a larger circle of fabric. 

 
The hearts were made using the easy "stich and flip" method for the patchwork, then I hand embroidered along the seams; nothing too difficult given my limited embroidery skills.  You can see in the photo above, there is slit (top of photo) that allows you to place the tree skirt around the base of the Christmas tree while the binding around the inner circle has ties at each end to hold it in place. 


I am concerned that this might not hold up well if washed but we've used it every year since I made it and I haven't needed to wash it yet.  


Monday, December 2, 2013

Christmas Quilts Past

I'm slowly working on putting up the Christmas decorations here on Main Street.  The quilts were the first to come out and gave me an idea, since I don't have any quilt-making progress to show off this week, of showing you some of the Christmas quilts I made in the BB era (Before Blogging).

This is one of my early quilts and the first Christmas quilt I made.  The pattern was from an issue of American Patchwork & Quilting magazine, in the mid-90's.  I was not able to find it on the magazine's website.  It is very easy and you can make it as scrappy as you want to.  I  used a single fabric for all the stars and another single fabric for the outermost rectangles; the inner squares and rectangles are real mix of mostly Hoffman Christmas prints. 

 
I didn't yet know about the longarm quilting industry so was hand quilting every quilt I made.  I used masking tape to mark straight lines in a cross-hatch pattern. 


I liked this quilt so much, I made it two more times.  My second version was a throw size that I gave to my mother and the third fits our queen size bed; it is there now.


Wednesday, November 27, 2013

College Girl Comes Home

 
There might be some sewing later today but first, it is time to cook.  


My baby college girl is home for the first time since late August.  To celebrate, we are making some of her favorites!
 
I hope you have your special people with you to share Thanksgiving.  Have a good day, a wonderful meal, and don't get hurt when you hit the stores for the sales!


Monday, November 25, 2013

Let's Talk About Thread

I've spend the past few days piecing these little units.  They finish at 4" square and I need 64 of them. They will form the four corners of the star blocks for Twilight Hopscotch.   I had to take the photo in poor light (the weather is not cooperating here); the background is white, not pink.


I usually piece using thread in a neutral color;  ecru, beige, or gray.  I use white thread if ecru seems too dark, like when I have a lot of white background.  Any of these neutral colors blends into most printed fabric but two color quilts can be tricky.  I used gray thread on all of my blue and gold school auction quilts, which worked very well. 

I had to give some thought to the thread for this green and white quilt and have settled on a plan.  I used green on top and white in the bobbin when I sewed the green and white fabric strips together.  These strips get sub-cut to make the mini four patch units then joined with the white squares to make the larger four patch units.  I used white thread in both top and bobbin to sew the four patch units. 

To make the stars, I'll go back to green thread on top, white in the bobbin to make the star points, then green on top and bobbin to join the points to the center square.  Then to join all the pieces into  the star block, I'll switch back to white thread.  I think this will work well; I just have to remember to make all the thread changes!

Friday, November 22, 2013

Four Patch Mania

My first step in making Twilight Hopscotch is making the four patch units.  About a gazillion of them...ok, I exaggerate, 128 to be exact.  They are strip pieced, sliced and diced, and sewn again.  Very easy.


In fact, I think this quilt will be quite easy and fast to make.  Definitely worth considering if you are looking for a design for a two color quilt, or even a three color quilt. 

Wednesday, November 20, 2013

Twilight Hopscotch

For my next project, I'm turning to my Pinterest quilts to-do list and starting Twilight Hopscotch.  The pattern is by Kim Diehl from her book Simple Comforts. 

 
This will be a Christmas quilt.  I'm using this snowflake batik fabric with a green tone-on-tone with gold metallic flecks.  I'm not "into" batiks but saw this one at my LQS, liked it, and thought it would be good in this particular quilt.  The background will be Kona white. 
 
I have the pieces cut and ready to sew.  This will be a good project for evenings after work, when I have 20 or 30 minutes to spend sewing after dinner. 


And speaking of cutting, I've been meaning to mention these new rotary cutters from Olfa.  Do you have one?  They are worth buying because they've made changing the blade so much easier and less hazardous.  The old one pops off with the flick of a switch; put the new blade in place and flick the switch back, and voila, ready to go!  No nuts and washers, no wondering about the correct order for replacing all the parts - so easy!


Monday, November 18, 2013

It's Complicated - A Finished Quilt

I put the binding on over the weekend and now I have a finished quilt.


I made the scrappy LeMoyne Star blocks last spring.  My original plan was for a simple quilt layout, alternating star blocks with plain blocks.  Then I got another idea.  I drafted my own alternating block, cut the fabric pieces, and set to work sewing them up.  The quilt is set on point, alternating the two blocks, and setting triangles form the solid border.  The revised layout led to the name, It's Complicated.


Mr. Main Street did his best but his wingspan is not quite wide enough for the size of the quilt.
 
Karen Thompson quilted It's Complicated with a curlicue vine and hearts pantograph design. 


I'm so happy with the way this quilt came out.  It is part of my series of Fig Tree Harvest quilts, an attempt to use up my extensive stash of fabric from Fig Tree & Co. collections for Moda. My earlier quilts used the more girly pastel and floral prints but I used more of the brown and carmel fabrics, with a little red and green, in It's Complicated.  I'm glad I did because the colors make for a different look.
 
I used a special ruler to make the LeMoyne Star blocks, the Rapid LeMoyne Star ruler from Studio 18 Designs.  The ruler simplifies the block construction so it doesn't require any set-in seams.  Using it was a breeze; I highly recommend it for this block.
 
I'll be back later this week to share the start of my new project.


Monday, November 11, 2013

Modern Bee by Lindsay Conner

My other leisure time activity is reading.  When I don't post here for a while, it is sometimes because a book has hijacked me from the sewing room.  I was at our local public library on Saturday and saw this book, Modern Bee, on a display so I checked it out. 

 
The quilt patterns in the book were designed by members of the Mod Stitches bee, a group originally formed to swap patchwork blocks.  This was an online group that met through their blogs and Flickr.  The designs in the book can be made as part of a bee or individually.  There's a chapter on starting and running an online bee; the tips would work for an in-person exchange as well.  Then the quilt designs are arranged in order by skill level; 13 projects in total.
 
My favorite design in the book is Trellis Crossroads, by Jessica Kelly.  It is made using 20 fat quarters and three yards of background (white) fabric.  This one is going on my to-do list as soon as I decide what fabric to use.


I also like this design, Baseball Curves, by Lindsay Conner.  The tricky thing about this design is that is uses templates, which are not one of my favorite things.  


I would probably not have paid attention to this book in a quilt shop because the cover is kind of boring (yes, I judge my quilting books by their covers; they have to get my attention) but I'm glad I picked it up because it has given me a few ideas.  And while a bee is probably not in my near future, I think I'd enjoy that kind of swap too, some day. 

Oh, and if you're looking for a novel to read, I recommend Bridget Jones Mad About The Boy, by Helen Fielding, a worthy sequel to Bridget Jones's Diary.  But don't be surprised if it cuts into your quilting time.

Monday, November 4, 2013

Finally...A Finished Flimsy

You may have been wondering where I've been.  Events conspired to keep me from quilting during October.  Lots of work, a trip to Miss Main Street's college for parents' weekend, then a monster cold that left me in no condition to do much more than watch the World Series on TV. 

But finally, my Jubilee top is finished.  I took this photo in Miss Main Street's bedroom on a cloudy day; the colors are actually brighter and sharper. 

 
This is a monster quilt - 98 inches square, though it may shrink an inch or so when quilted.  Plenty ample for our queen size bed, might even fit a king bed.   The long, drawn out last step was adding the borders.  I made them per the pattern directions, with a narrow white inner border that matches the sashing, followed by a medium width print border, then a third, wider white border.

 
For the print border, I used the Fig Tree fabric that had been my original choice.  I had used this print to select all the fat quarters I used for the 40 blocks.  Here it is off to the left on my design wall with the first 12 blocks. 
 
 
Here's another shot of the border with some of the blocks.


I have the backing pieced too, and am on my quilter's list for January.  Now I get to start something new.  What will it be?

Friday, October 25, 2013

Blogger's Quilt Festival - Pineapple Two-Color Quilt

My entry in this fall's Blogger's Quilt Festival is my only two-color quilt, Rendezvous.

 
I am absolutely smitten with the fabric lines from French General.  I looked for a design that would make the most of the colors in this fat quarter pack from the Rouenneries Deux collection and settled on the pineapple block to combine the various shades of red with the neutrals.

 
The pineapple block is made in rounds, similar to the construction of the (much easier IMO) log cabin block.  I cut my fabric into 1.5 inch wide strips and used a special pineapple ruler to trim and square up the block after each round.  (You can read more about the ruler and how to use it in my post here.)
 
 
Working on five or six blocks at a time, the quilt gradually began to take shape on my design wall.  I reserved the darker toned neutrals for the blocks that would form the outer border of the quilt; in this way, what you see as the border was formed by color placement in piecing the blocks.

 
Here is a photo of part of the finished quilt, where you can see how the border turned out.
 
 
Rendezvous was quilted by a long arm quilter, Karen Thompson, using a traditional French motif, the fleur-de-lis.  You can see it more clearly in the second photo below, where the motif ran off the edge of the quilt into the surplus batting.  Of course, this was trimmed off to apply the binding.


For backing, I used a red-on-sand floral print from one of the French General fabric lines.

 
Here's the finished quilt again.  Rendezvous is 68" square (49 blocks, arranged 7 by 7), perfect for a throw quilt on the couch. 
 
 
I'm entering Rendezvous in the Two-Color Quilt category in Blogger's Quilt Festival.  Click over to Amy's blog to see lots more quilts in the biggest quilt show online!

Monday, October 21, 2013

Main Street - My Finished Quilt

We visited Miss Main Street at college this weekend so I didn't have much time for sewing.  But  I finished the binding on this little (31" by 36") wall hanging on Sunday night and it is now hanging in our kitchen.


I'm calling this quilt Main Street, which is the actual name of the street where we live.  I made this quilt using a Schnibble pattern called Full House, altering it only to include the trees. 

Karen Thompson of Poppycourt quilted Main Street for me in a custom design.  She made shingles in two different styles for each roof...


...added some texture to the trees...

 
...and quilted a simple cross hatch in the "sidewalks."  There is also a gorgeous feather-like vine in the border but it did not photograph well.


It looks perfect hanging in our kitchen.  Main Street is my first Schnibble but won't be my last!