Showing posts with label labels. Show all posts

Wednesday, July 22, 2020

How I Label My Quilts


Do you label your quilts?   As the last step in making a quilt and calling it "done" I add a label made with inkjet printable fabric.  I've been using a product from Dritz called Printed Treasures but it appears to be out of stock everywhere I shop (I wonder if they stopped making it) but there are other versions.  Fat Quarter Shop sells a product from EQ, here;  Amazon has several brands, here.

Inkjet printable fabric is fabric bonded to a paper backing that can be fed through your inkjet printer.  I set up a template in my Word software so I can print four labels at one time.  


I do a test run on a piece of paper to be sure the spacing is good, with sufficient margin around each label.  Note, my template makes the four labels in "landscape" format.


When I'm happy with the spacing and have double-checked for typos, I print on the fabric sheet.  You put the fabric sheet in the paper tray of your printer, just like a piece of paper.  (Do be sure you understand how a sheet of paper goes through your printer; mine has to go in the tray fabric side face down.)  Then print.  I've never encountered any problems with the fabric sheets running through the printer.  Below, the fabric version is in back, the paper copy in front.


I give most of the my quilts a name, but that's optional.  I add my name, the name of the quilter (if machine quilted) and the year made.  I'll add other information I think pertinent, like the name and designer if I used a commercial pattern for the quilt.  You can add much more, like more background on the design, the name of the recipient, etc.

I use a rotary cutter and ruler to cut the four labels apart.  Sometimes when I have scraps of fabric from the quilt top, I use them to frame the label before attaching it with a slip stitch to the back of the quilt.  


Otherwise, just turn under a quarter inch on all sides of the label and stitch it down.


But the label doesn't have to be square or rectangular.  I used an oval template for the label below.   And a few times, with a pieced back, I've pieced the label into the backing itself, prior to quilting.


The only issue I've run into with the printable fabric is that it tends to yellow slightly over time; you can see it on some of my older quilts.  But I'm generally happy with it and find this is the best way for me to make labels.  Some quilters are able to free hand write their labels and I tried that a few times but find I like this method better because I don't have artistic printing or hand writing.

Covid-19 has given me a period of productive quilt making so there will be more labels in my future.


photo signature_zps7mcw44cc.png


Monday, December 1, 2014

Merry and Bright - A Finished Quilt

I finished a Christmas quilt, just in time for the Christmas season.  Here is Merry and Bright!


I made Merry and Bright using a pattern called Trellis Crossroads from the book Modern Bee.  I like the clean lines of this design, so modern, and have seen it made up in other fabrics on the internet.  The design lends itself to just about any fabric collection, plus stash, which is what I used for my Christmasy version. 

This is what a finished block looks like.  The blocks get trimmed down and then sewn together to create the look seen in the finished quilt.  And this is where I had a problem with the pattern.

 
The directions for trimming the blocks are too cryptic. It is important that you measure from the center of the block out to edge and trim, to ensure the trimmed blocks will be uniform and the seams will match when you start sewing together.  If you don't do this, you will have mess of mismatched seams. 
 
Karen Thompson quilted Merry and Bright for me, using this loopy design.  I think the seams in the large white spaces will be less noticeable after a washing. 


My finished version is 62" by 74" which is a good size for a throw quilt.  It is our first Christmas decoration of this season.


I did a lot of labeling over the weekend.  When I cleaned up my sewing room for the house tour, I found a stash of labels I had made for various quilts but never sewn on.  That oversight was rectified this weekend and I am now caught up. 

Occasional Piece Quilt has a tutorial on how to make this kind of quilt label using your computer printer. 

Tuesday, December 11, 2012

Boughs of Holly, A Finished Quilt

Boughs of Holly came back from longarm quilter Kari Ruedisale a few weeks ago but it wasn't until this weekend that I got it bound and labeled. 

 
Now it is finished and gracing one of the new chairs in my newly painted living room. 


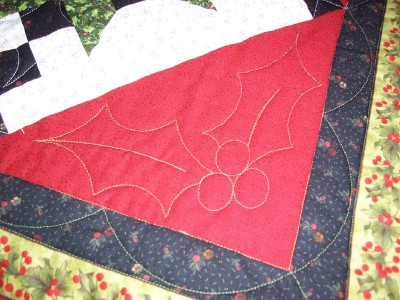
The quilting design includes holly leaves and berries in the side and corner triangles.  Kari used green thread on the red triangle, which helps the quilting show up a little more than matching red thread would but is not the major contrast that white thread would make.  She used white thread in the pieced blocks.
 
 
Boughs of Holly is about 70" by 80" which is a good size for a twin bed, a little big for a throw. I made it using the pattern Crossroads from Bonnie Blue Quits/Red Crinoline Quilts.
 
 
My quilt takes it name from the fabric I used for the border, a holly print stripe by April Cornell that I've had in my stash for a few years.  I unearthed another big stripe print, perfect for a border, and I'm mentally planning a project for it for next year. 

 
I try to be diligent about labeling my quilts. Lately, I've been doing this by printing the label copy onto printable fabric sheets, composing them on the computer in Word then printing using my ink jet printer.  I frame the printer fabric with some scraps left from the quilt top then slip stitch it on the back near a corner. 


I can usually get four labels on one fabric sheet (they are a bit pricey; I stock up when I have a discount coupon to use at Joann's).


Then I cut the labels apart, trim each to size while centering the copy, and sew fabric strips to all four sides.  Turn under the raw edge and slip stitch to back of quilt, similar to the hand sewing stitch I use to stitch down the back side of the binding. 


With Keep Calm and Sew On (the spools quilt), I used a different fabric print on each side of the label, for a scrappy look. 


Occasionally, when I'm making a pieced back, I will piece the label into the backing.  This means the label is ultra secure as it gets quilted right into the back as well.  However you do it, do be sure and label your quilts.