Monday, September 30, 2013

Outgrown

I did  not have much time to spare for my sewing machine last week but I did get a few Jubilee blocks done.  With all 49 up, I've outgrown my design wall.  The blocks in the column on the far right are hanging, half on and half off. 


I did my usual arranging and re-arranging of the blocks, agonizing over the color placement, but I'm happy with it now.  The challenge will be to keep all the blocks in their assigned positions as I attach the sashing and sew the blocks into rows.  I've seen some gizmos that are supposed to help with that process, lettered tags and numbered pins, and things of that nature, but have not used any myself.  If you've used any of these items, I'd like to know what you think.  A worthwhile investment in your opinion?

Tuesday, September 24, 2013

I Was Tempted At The Quilt Show

I did my bit for the quilting economy and made some purchases at the quilt show last week (Pennsylvania National Quilt Extravaganza XX).  My first purchase was this basket from Ghana, sold by French Connections, a vendor of French fabric and African baskets.  I'm planning to use it to hold either my upcoming project or scraps in my sewing room.  The vendor had some more colorful baskets which were beautiful but I chose this simple design to match the color scheme in my sewing room.  It came in handy as a shopping basket for the rest of my purchases.


Last year (or maybe in 2011), I bought a set of rulers called Leaves Galore.  I haven't used them yet but have good intentions so this year I picked up a book by the originator of the ruler.  While Leaves Galore has videos on YouTube, I thought this book would be a handy reference for how to use the rulers plus it has directions for several projects.

 
This is what a Leaves Galore ruler looks like. 


I am determined to make something bright and modern from Kaffe Fassett fabric.  I  have a few fat quarters already but saw these coordinated fat quarter packs and they called out to me.  I'm not sure what I'm going to do with them but when I decide, you'll see it here.


I needed some more greens for my stash and a vendor called The Christmas Shoppe had a great selection so I picked up eight half-yard pieces.


Miraculously for me, I did not buy any rulers or other gadgets.  I did see a demo of the log cabin square up ruler from Creative Grids.  I didn't buy one at the show but I could be tempted if I decide to make another log cabin quilt.  I'm trying to figure out if a regular 8" ruler could be used in a similar fashion.

Friday, September 20, 2013

Award Winning Quilts From Pennsylvania National Quilt Extravaganza XX

On Thursday, I gave myself a treat and visited the Pennsylvania National Quilt Extravaganza, an annual quilt show near Philadelphia.  As usual, there were some truly awesome quilts on display.  Here are a few that really impressed me.


Nocturnal Garden, by Deb Crime of Marco Island, FL
49" by 22"
won blue ribbon for best machine workmanship
 
As I approached Nocturnal Garden, I thought the applique was done in wool but it turned out to be cotton in rich colors. The workmanship is outstanding. 


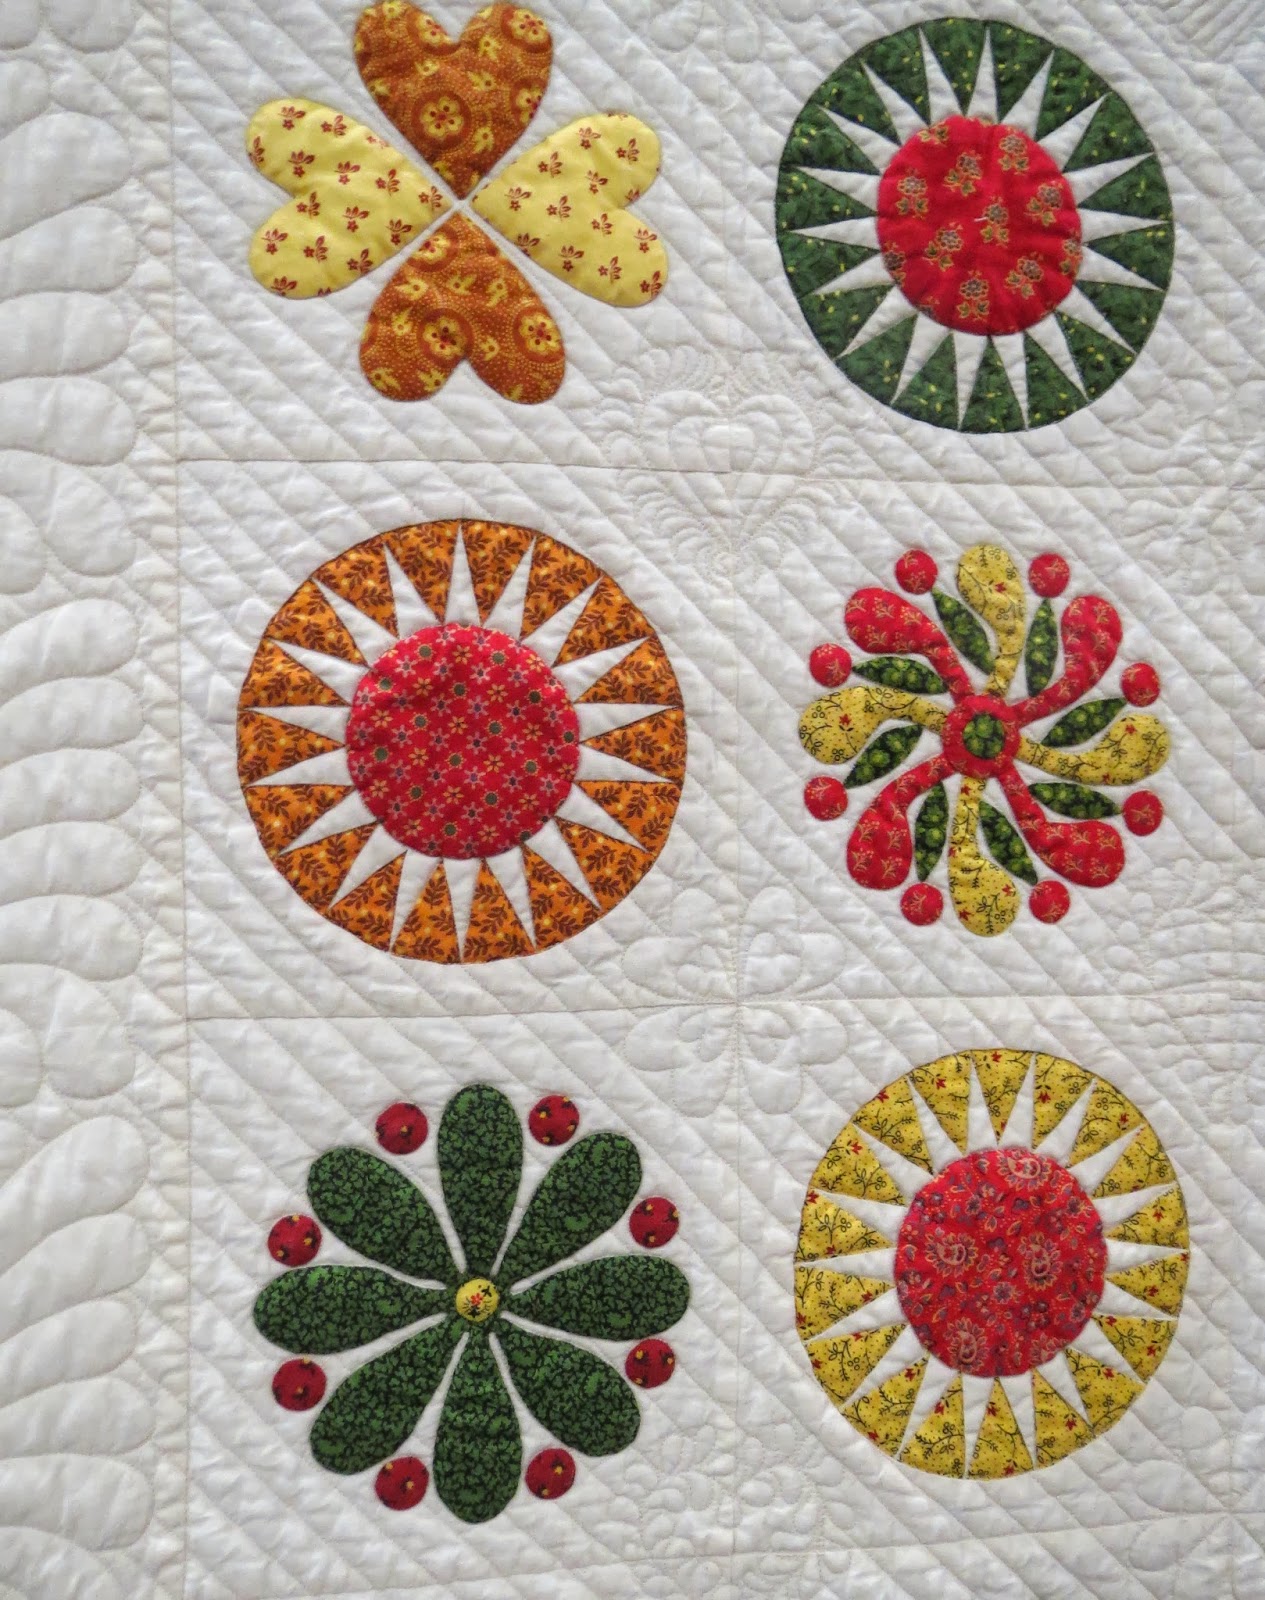
Pennsylvania Hearts & Hands, by kelley Cunningham, Stevensville, MD
98" x 74"
won blue ribbon for best interpretation of the show theme
 
Pennsylvania Hearts & Hands is a reproduction of an historic quilt.  The blocks are about 5 inches square, and even though it uses 19th century reproduction fabrics, it would not look out of place in a modern decor setting. 


The quilt was machine quilted on a longarm, with different motifs in the intersections between the blocks and a sort of feather design in the borders.


On Green Pond, by Judith Wilson, Wheathampstead, UK
62" x 64"
Honorable Mention ribbon winner
 
Can you believe, this quilt started out as a jelly roll!!!!  The center uses off-center pineapple blocks framed by an intricate machine appliqued border of birds and branches. 


Star Burst, by Mieke Apps, Okaihau, New Zealand
63" x 63"
won blue ribbon for best use of color
 
The center blocks of Star Burst are irregularly pieced, like a crazy quilt but without the embroidery.  This quilter must have an impressive stash as this quilt used small pieces of hundreds of different fabrics, each piece blending into the next.


Tennessee Treasures, by Linda Roy, Knoxville, TN
72" x 72"
won 3rd place in the traditional category
 
Tennessee Treatures was designed to showcase authentic Tennessee feedsack fabric.  The sawtooth edge on each block and the border are hand appliqued in place, not pieced.  The top edge and handle of each basket are ruched, providing some nice dimension, while the piecing and quilting are further enhanced by embroidery in what I think is perle cotton.


I noticed that many of the quilts on display are densely quilted with machine quilting.  In a few cases, the quilting was too dense for my taste, when it looks more like machine embroidery that covers the fabric than like traditional quilting.  Quilting that dense must make for a very stiff quilt.  Fine for wall hangings in my opinion, but I like lap and bed quilts to have some drape to them.  My taste aside, there are a number of longarmers out there who are exceedingly talented and have raised machine quilting to its own art form.  I remember when machine quilters mostly duplicated hand quilting patterns, then came the pantograph or edge-to-edge design.  Now the award winning machine quilting is on a different level, producing effects that cannot be done (realistically) by hand quilting.  It is certainly impressive.

I'll save the report of my purchases from the many vendors for another post.


Tuesday, September 17, 2013

Quilts Using Layer Cakes

My current work in progress uses a pattern called Jubilee from The Pattern Basket.  It calls for a layer cake, those 10" square pre-cuts of fabric.  I'm coming to think this is a very versatile pre-cut and may be the answer when I fall for a new fabric line but don't know exactly what I want to make. 

Here are a few quilts I've made using patterns designed for layer cakes:

 
Hello Sunshine, based on a pattern called Changes

 
Magic Eight Ball (my tutorial here)


Christmas Ribbons, based on a patter called Ruby's Ribbon Box


I did actually use a layer cake for Magic Eight Ball.  For the others, a mix of fat quarters and odds 'n ends from my stash. 
 
I found seven yet-to-be-used patterns in my collection, all designed for layer cakes.  I think Margot of The Pattern Box is a layer cake enthusiast; four of my patterns are her work and Jubilee is also her design.  

 
I like the pattern Sweet Pea so much, I actually broke down and bought a layer cake of Honeysweet, the newest fabric collection from Fig Tree Designs.  I know, I know, I'm supposed to be using my Fig Tree stash, not adding to it!
 

Fig Tree has some layer cake friendly patterns as well.  I have Butterscotch Tart and Boardwalk in my collection, waiting for the right fabric inspiration to come along.


And high on my quilt to-do list is Odile Stars from Planted Seed Designs.  I LOVE the look of these star blocks.  But an important note, I've just realized this pattern uses 25 fat quarters, not a layer cake.  That's OK, I have plenty of fat quarters in my stash.

Have any layer cake patterns caught your eye lately?


Sunday, September 15, 2013

Twice A Year

My favorite quilt magazine comes out two times a year.  It's Quilt Sampler.


If you are still in the dark about this publication, let me fill you in.  Each issue covers 10 quilt shops from around the US and Canada.  There is a profile of each shop, along with lots of photos, and directions for a quilt project provided by each profiled shop.  The pictures from the various shops provide plenty of inspiration.  Inevitably, I see a quilt displayed in one of the shop photos and have some sleuthing to do to track down the pattern.
 
Speaking of sleuthing, Quilt Sampler had some competition for my spare time this weekend from W Is For Wasted by Sue Grafton.  If you like mysteries and have not yet discovered Sue Grafton's work, you need to get busy!  Start with A Is For Alibi


Friday, September 13, 2013

Silver Jubilee

25 blocks finished


24 more to go.  That's more than halfway!  However, a few may not stay in the final mix; it depends on how well they all play with each other. 

Wednesday, September 11, 2013

Oops!

Um, it doesn't look quite right.  In fact it's obvious I did something wrong here!


What makes it worse is that I've done this twice.  Oh well, I'm becoming proficient with the seam ripper.

Monday, September 9, 2013

Slow and Steady

12 blocks finished, 37 to go.


The fabric hanging on the left will be the border.  The pattern shows a narrow band of print fabric between two bands of background fabric as the border.  I am using the border fabric to determine the fabrics to use for the blocks while reserving the right to swap in a green tone-on-tone fabric for the border at the last minute if it looks better. 

I have fabric cut for 24 blocks to work on this week.


Friday, September 6, 2013

Favorite Tools

This is one of the 49 blocks I need to make for my queen size version of Jubilee, a quilt pattern from The Pattern Basket.

 
The Jubilee block is an Ohio Star with added piecing in the corners of the block.  Each block requires four quarter-square-triangle blocks (also known as hourglass blocks).  The designer has you make them from squares of fabric by drawing a line diagonally on the wrong side of the fabric and sewing on either side of the line, then cutting down the middle to form two half-square-triangle blocks.  The process gets repeated with two of the HSTs sewn together and cut apart to form the hourglass block.  Drawing the lines gets tedious, especially when repeated so many times.  Fortunately, I know an easier and faster way!


It's the Clearly Perfect Angles tool!  (Do I sound like an infomercial?)  It is a piece of thick plastic film that clings to the sewing machine and to acrylic sewing tables.  The markings on the film are guides for lining up fabric pieces and keeping them aligned as they pass under the needle.  The video on the website explains better than I can.  There are other similar tools out there, such as the Angler II.  Tools like this eliminate the need to mark your fabric; just line up with the markings and sew!

After these units are sewn, they need to be trimmed to size.  That's when my Tucker Trimmer comes into play.


It is great for trimming down the hourglass units into the exact size needed.  I line up the diagonal lines on the ruler with the diagnonal seams in the square, selecting the markings on the ruler for the size I need to cut (4" in this case). 

 
Trim two sides, then rotate and trim the other two sides.  My Olfa rotating mat is pretty handy too.

 
Fast and easy and accurate!  No need to struggle with math to figure out the center point on your ruler or risk lining it up wrong.  I love this tool and have it in two sizes.

 
Hey presto, a perfect unit for the final block!


Five blocks finished, 44 to go!


Tuesday, September 3, 2013

Jubilee Blocks

Wow, I needed a long weekend!  We got Miss Main Street delivered to college last week so I decided this weekend was a good time to thoroughly clean her bedroom at home.  So much easier with her (and much of her paraphernalia) absent.  One cleaning task led to another, then came the realization that I would have to take on Miss Main Street's former chores around the house, mainly vacuuming (two or three times a week because of the two dogs) and emptying wastebaskets.  To compensate, there will be less laundry! 

But with the extra day off work, there was still plenty of quality sewing time.  I began sewing the blocks for Jubilee.  I have five blocks finished and several more in progress.  They are going together very well so I will cut the pieces for the additional blocks I need this week.


The block for Jubilee is an Ohio Star with the additional squares of fabric in the corners.  The Jubilee pattern makes extremely efficient use of layer cake squares (layer cakes are stacks of 10" squares, typically 40 pieces, all from a single fabric collection).  Initially, you cut the layer cake square into three 5" squares and one 4" square.  The 4" square forms the center of the block and the 5" squares are sewn and recut to form the other pieces. 

I'll be back later this week with more blocks.