Monday, December 31, 2012

How Much Thread Does a Quilter Use In a Year?

About this time last year, I was wondering how much thread I really use in a year.  I decided to save the spools as they emptied, as a way of getting a rough count.  I say "rough count" because I had used thread off some of the spools in a prior year and I've started a number of other spools that aren't used up yet so they didn't get tossed in the empty spool basket.  This is particularly true of all the different colors of thread I've used for applique.  But I figured this method would be good enough to satisfy my curiosity. 

And here is the result:


10 empty spools!  I thought it would be more but this makes sense when you consider that I finished only seven quilts and did not quilt any of them myself.  I am currently hand quilting a smaller quilt but likely won't use up the whole spool of hand quilting thread on it. 

Do you have any idea how much thread you use?  Enquiring minds want to know!


Friday, December 28, 2012

Friday Find - Bloc Loc Rulers

I enjoy the process of making quilts as much as the finished product, and I find that having the right tools makes the process even more enjoyable.  As a result, I'm a sucker for any sort of tool that looks like it will make the more tedious, repetitive steps go faster or that will help improve accuracy.  I especially want to avoid having to rip out and re-sew.

I first encounted Bloc Loc rulers at a quilt show where they were being demonstrated.  Bloc Loc rulers have a channel that snugs up to the seam, eliminating slipping and ruler rock when you trim.  I've found that the best way for me to get accurate flying geese blocks is to make them a little bit over-sized then trim them to size before sewing them into larger units.  There are a number of different rulers out there that help you do this; I have and use both the Fit To Be Geese ruler from Open Gate Quilts and Deb Tucker's Wing Clipper,  but my new favorite is the Bloc Loc. 

 
See how the channel in the lucite ruler snugs up to your seam line?  It is so easy to cut around this ruler accurately. 

 
The only drawback is that each Bloc Loc Flying Geese ruler makes only one size block, unlike the other rulers which work for a range of sizes.  So I've been buying the rulers as I have a project come up that warrants its use. My latest is the 3" by 6" size.  I'm using it to construct the 2013 school auction quilt. Oridinarily, I prefer smaller blocks but I find that a bold, graphic look works best when using this high contrast color combination (gold and blue are the school colors).  There will be a lot of flying geese in this quilt and this ruler is helping me construct them efficiently.


Monday, December 24, 2012

Merry Christmas!


Wishing you a Merry Christmas and a Happy New Year!
 
Cathy @ Quilting On Main Street


Saturday, December 22, 2012

Jelly Stars - An Almost Finish

Jelly Stars is a finished flimsy.  My name for this quilt is Sparkle, but I made it using the Fig Tree Quilts pattern called Jelly Stars  and a jelly roll from Blitzen, a Christmas line from Moda.   

 
Reggie refused to move from his napping spot to accomodate phototgraphy. 

The quilt finished at about 75" square.  It went together very easily, with directions that eliminate the need for set-in seams or anything too advanced.  I think it is a great quilt to make if you have a jelly roll and have been wondering what to do with it. As you can tell from the pattern cover, it works well for a non-seasonal look too.

 
Mr. and Miss Main Street have been busy, holding up the finished quilts for photo taking. Miss Main Street suggested that I get a quilt holder, like a clothesline, because she won't be around next year to do this job. I will have to figure out an alternative.  Or else limit myself to small quilts.
 

Wednesday, December 19, 2012

Summertime in December - Another Finish

Back from the longarm quilter, bound, and labeled - Summertime, my Dresden Plate quilt.


Summertime is 80" square, with 16 Dresden Plate blocks.  I made my blocks with the Fat Cat ruler, a 30 degree ruler that yields a circle with 12 blades (many Dresden Plates are made with 16 or 20 blades).  I hand appliqued each block onto the background.  I used fabrics from various Fig Tree collections, except the sashing and binding fabric, which is a pindot print from the Bliss line by Bonnie and Camille for Moda. 

 
Kari Ruedisale quilted Summertime, using a floral motif in the blocks where the petals form a star in the center.  There is a vine with curlicue tendrils quilted in each of the two borders.  The squares in the pieced middle border finish at 1".


Summertime was named after this floral chintz china pattern.

The Fig Tree Harvest tab under the header at the top of this page will take you to photos of all the quilts I've made so far in my Fig Tree Harvest project (an effort to use my extensive stash of fabric from the collections by Fig Tree Quilts). 

Monday, December 17, 2012

Quilted Christmas Stockings

 
I made Miss Main Street a stocking for her first Christmas, 17 years ago.  It is quilted, with prairie points and a vintage lace cuff at the top.  (It is the red stocking in the center.)  When Reggie joined our family, I made him the stocking on the left.  Last week, I turned out the one on the right, just in time for Dillie's first Christmas.  (For new and intermittent readers, I clarify that while Miss Main Street is our human child, Reggie and Dillie are our dogs, both Pembroke Welsh Corgis.  We have a tendency to treat them like two-year-old human children.)


The construction of the stockings is very similar to making a tiny quilt.  You can't see it but there is a small amount of quilting on the body of the stocking.  I used a thinner batting so they would not be overly bulky.  And the edges are bound, just like a quilt, with bias binding to go smoothly around the curves of the toe and heel.  I used the tail end of the binding to form the hanging loop.  I used vintage lace from my collection of "cutters" on all three stockings. 
 
I have quite a bit of vintage lace and need to come up with more ways to use it.  Christmas stockings along will not do it as we are certainly not having more children and grand children are a long ways in the future. 


Thursday, December 13, 2012

Christmas Quilts All Through The House

Now that the painting job is finished in our living room and dining room, I can get the rooms decorated for Christmas. I started by spreading the Christmas quilts around.

If you've been following my blog for any length of time, you may recall my stated wish to have enough Christmas quilts to replace the everyday quilts on the upstairs landing.

 
Due to the large size of the lower quilt, I've achieved that goal, though that does not mean I will stop making Christmas quilts, oh no!  I have several more in mind.


By the way, the quilt on the upper left is from the patten Brand New Day from Miss Rosie's Quilt Co.  The lower quilt is also from a Miss Rosie pattern but I can't remember the name.  The quilt on the upper right is a log cabin, made without a pattern.
 
Christmas Stars and Christmas Ribbons (from pattern Ruby's Ribbon Box by Little Louise Designs) are in the living room.


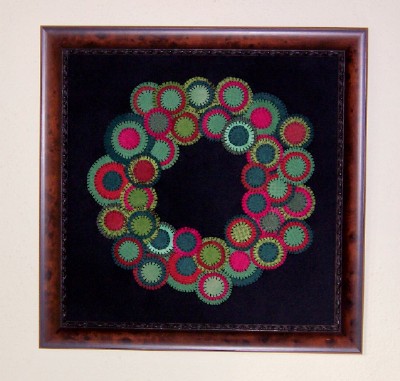
And my novice effort with wool is hanging nearby.


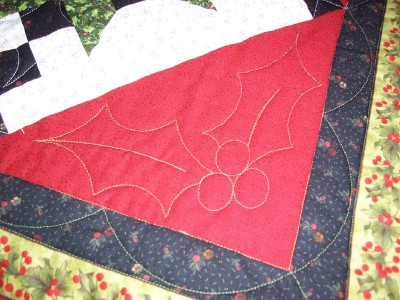
And one of my earliest quilts is on our bed.  The pattern was in an issue of American Patchwork & Quilting about 10 years ago.  I made this back before I knew about longarm quilters for hire so I hand quilted it - a long term project! 

 
All of the stars are the same snowflake print and the backgrounds are very, very scrappy.  At the time, I did not have the extensive stash I have now, so I had to buy a lot of fat quarters and quarter yard cuts to get the scrappy look. I used a lot of Hoffman prints because at the time, they were making the most gorgeous prints with flowers and leaves.  I had a lot left over so I made a smaller version for my mother,  She puts her quilt on the back of a red couch in her family room during the Christmas season. 
 
 
No tree yet but it's beginning to look a lot like Christmas!


Tuesday, December 11, 2012

Boughs of Holly, A Finished Quilt

Boughs of Holly came back from longarm quilter Kari Ruedisale a few weeks ago but it wasn't until this weekend that I got it bound and labeled. 

 
Now it is finished and gracing one of the new chairs in my newly painted living room. 


The quilting design includes holly leaves and berries in the side and corner triangles.  Kari used green thread on the red triangle, which helps the quilting show up a little more than matching red thread would but is not the major contrast that white thread would make.  She used white thread in the pieced blocks.
 
 
Boughs of Holly is about 70" by 80" which is a good size for a twin bed, a little big for a throw. I made it using the pattern Crossroads from Bonnie Blue Quits/Red Crinoline Quilts.
 
 
My quilt takes it name from the fabric I used for the border, a holly print stripe by April Cornell that I've had in my stash for a few years.  I unearthed another big stripe print, perfect for a border, and I'm mentally planning a project for it for next year. 

 
I try to be diligent about labeling my quilts. Lately, I've been doing this by printing the label copy onto printable fabric sheets, composing them on the computer in Word then printing using my ink jet printer.  I frame the printer fabric with some scraps left from the quilt top then slip stitch it on the back near a corner. 


I can usually get four labels on one fabric sheet (they are a bit pricey; I stock up when I have a discount coupon to use at Joann's).


Then I cut the labels apart, trim each to size while centering the copy, and sew fabric strips to all four sides.  Turn under the raw edge and slip stitch to back of quilt, similar to the hand sewing stitch I use to stitch down the back side of the binding. 


With Keep Calm and Sew On (the spools quilt), I used a different fabric print on each side of the label, for a scrappy look. 


Occasionally, when I'm making a pieced back, I will piece the label into the backing.  This means the label is ultra secure as it gets quilted right into the back as well.  However you do it, do be sure and label your quilts.


Sunday, December 9, 2012

A Winner...And Quilting With Layer Cakes


Thank you for all the birthday greetings.  Using the random number generator at Random.org, the winner of the layer cake is post number 13, Julie.  I've sent her an email message. 

The comments on my last post include some good suggestions for using layer cakes, including the Dresden plate block, Anita Solomon's Arrowhead block, layer cake patterns from Me and My Sister Designs, and the big Schnibble quilts from Miss Rosie's Quilt Co.  There were also a number of specific patterns mentioned:
Summer Breeze from Melissa Corry for Moda Bake Shop
Twilight Tango from Little Louise Designs
Baskets of Marmalade from Cotton Way
Slide Show from Terry Atkinson
Go Tell It on the Mountain from Konda Luckau for Moda Bake Shop
Sunkissed Jewel Box from Moda Bake Shop

More quilt patterns for layer cakes can be found in a post I wrote last spring.  The Moda Bake Shop patterns are free so that's always a good place to start if you are looking for ideas.  And the Fat Quarter Shop has a whole category of patterns that call for layer cakes; I rather like this Cluck Cluck Sew pattern called Dottie, this Cotton Way pattern called Star Blossoms,  this Fig Tree pattern called Sparkle (I would not have guessed it is based on layer cake), and Hidden Friendship by Planted Seed Designs.  Just click on the words in blue to be taken to site with the pattern mentioned.

Despite the birthday celebrations, I squeezed in some time to quilt and will be back shortly with a finish!

Tuesday, December 4, 2012

A Celebration!

This is post number 555 and it falls on my 55th birthday.  The coming together of these two events calls for a celebration.  And a celebration calls for cake!  Quilters want their Layer Cake!

So I'm having a giveaway.  Leave a comment here telling me the name and designer of your favorite quilt pattern that uses a layer cake.  On Sunday, I'll have a drawing (using the random number generator app) and the winner will receive the fabric layer cake of her (or his) choice, limted only by the stock on hand at my favorite online quilt shops.  (In case you are not familiar with this term, Layer Cakes are collections of 10" squares of fabric.  Made originally by Moda Fabrics, they are similar to charm packs except each piece of fabric is larger.  They typically include 42 pieces of fabric, one of each design in the collection, but the number can vary.)   

And look what I got for my birthday!  This was my present from me, to me!


When I first heard about the AccuQuilt Go fabric cutter, I was not really interested.  It seemed like a gimmick.  Then I saw more, including some quilts and other items made (or cut) by bloggers with a AccuQuilt Go or Go Baby.  Still, I thought I wouldn't use it enough to justify the cost.
 
But Olde City Quilts, one of my local quilt shops, had a great "Black Friday" price on the Go Baby and dies.   Now the price was low enough to justify getting it for only limited use.  While they didn't actually have the dies I wanted, I figured I could find them online; I ended up getting my dies from Amazon.com (great prices).  I will use the hexagon die to cut hexies from scraps; I figure it will save a lot of time for this job.  I will use the butterfly die for an applique quilt wall hanging. 
 
Remember, leave a comment about layer cake quilt patterns for a chance to win a Layer Cake.  And while you're leaving a comment, let me know about your experience with the Go Baby, if applicable. 


Sunday, December 2, 2012

Binding Next

We are in the process of having our living room, dining room, and foyer painted here on Main Street and as a result, there has been very little quilting going on.  Instead, I've spent my evenings boxing up the contents of the dining room hutch and moving furniture between rooms.  The house will look so good when the paint job is finished.

As I  have two quilts back from the quilter, this seemed like the pefect time for binding. 


I machine sewed the binding on both quilts on Saturday.  I use a walking foot for binding application, I think it makes the process a little smoother plus if helps prevent the binding application process form stretching the edge of the quilt.  Now it is time to hand stitch the other side, a good activity for the coming week.  Be on the lookout for two finished quilt unveilings!